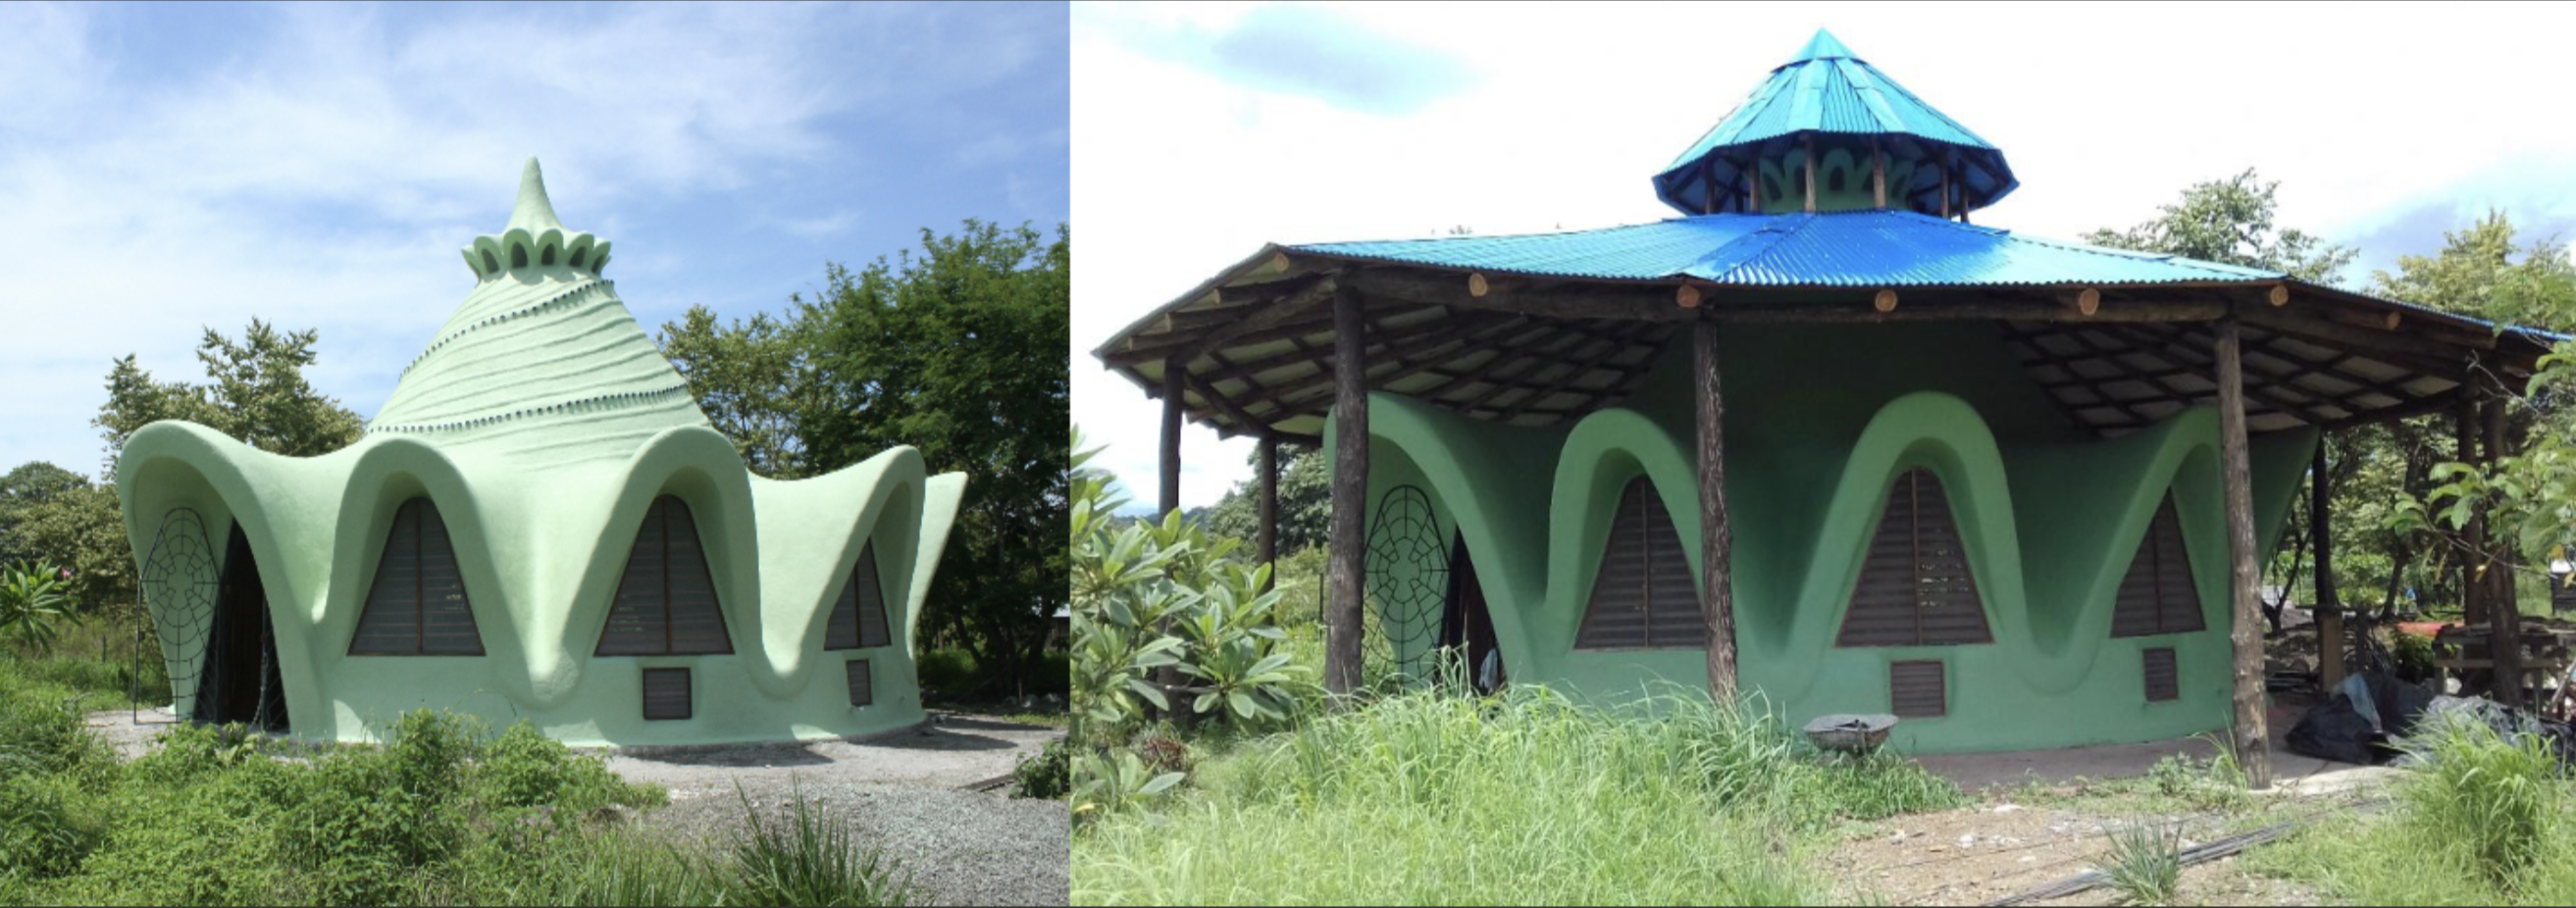
It’s humbling to reconsider something you invested years of your life into building. When we built our roofless earthen home in Tamarindo, Costa Rica, I was trying to do something that, at the time, I hadn’t seen anyone else do quite this way. I wanted to explore how far earthen architecture could be pushed—particularly whether it was possible to build a durable, sculptural earthen structure in a tropical climate without a conventional roof. There were lots of other experiments that I tried as well. Some worked remarkably well, better than I expected, and others not so much.
The house was absolutely beautiful. It was the biggest and most ambitious thing I had ever built, and I loved living in it. There are few things as rewarding as living in a house one designed and built. The earthen walls created an interior environment that was often surprisingly cool and comfortable despite the intense tropical heat. The organic forms were unlike anything that could have been achieved with conventional construction but there were also problems—some relatively minor, others extremely consequential.
Nearly a decade after finishing it, living in it, and observing various aspects of the building and thinking about what I would do differently, I’ve come to understand several aspects of the original design very differently. Rather than quietly leaving the old articles online and allowing readers to assume that I still endorse everything I wrote at the time, I decided to document what I’ve learned. This isn’t an attempt to disown the project. Quite the opposite. It’s an attempt to preserve what was valuable about the experiment while being honest about what I would change today.
The experiment
The basic idea behind the house was to create a highly sculptural earthen structure using a woven metal framework as both reinforcement and temporary formwork for the mud. I called the system “Wired & Daubed Capless Ferro-Cob” The framework allowed us to build shapes that would have been difficult to construct using conventional cob or adobe techniques. The wet earth could be applied directly to the framework, where it would remain supported while drying.

The traditional earthen building rule of thumb in wet climates is to build it with “good boots and a good cap”, meaning a good foundation and a good roof. I took it as a personal challenge to see if I could eliminate the conventional “cap” and substitute it with a good “raincoat” to protect the exterior shell instead. This was the part of the experiment that ultimately changed my thinking the most. My experience with this house gave me a much greater appreciation of this traditional wisdom. More on that later…
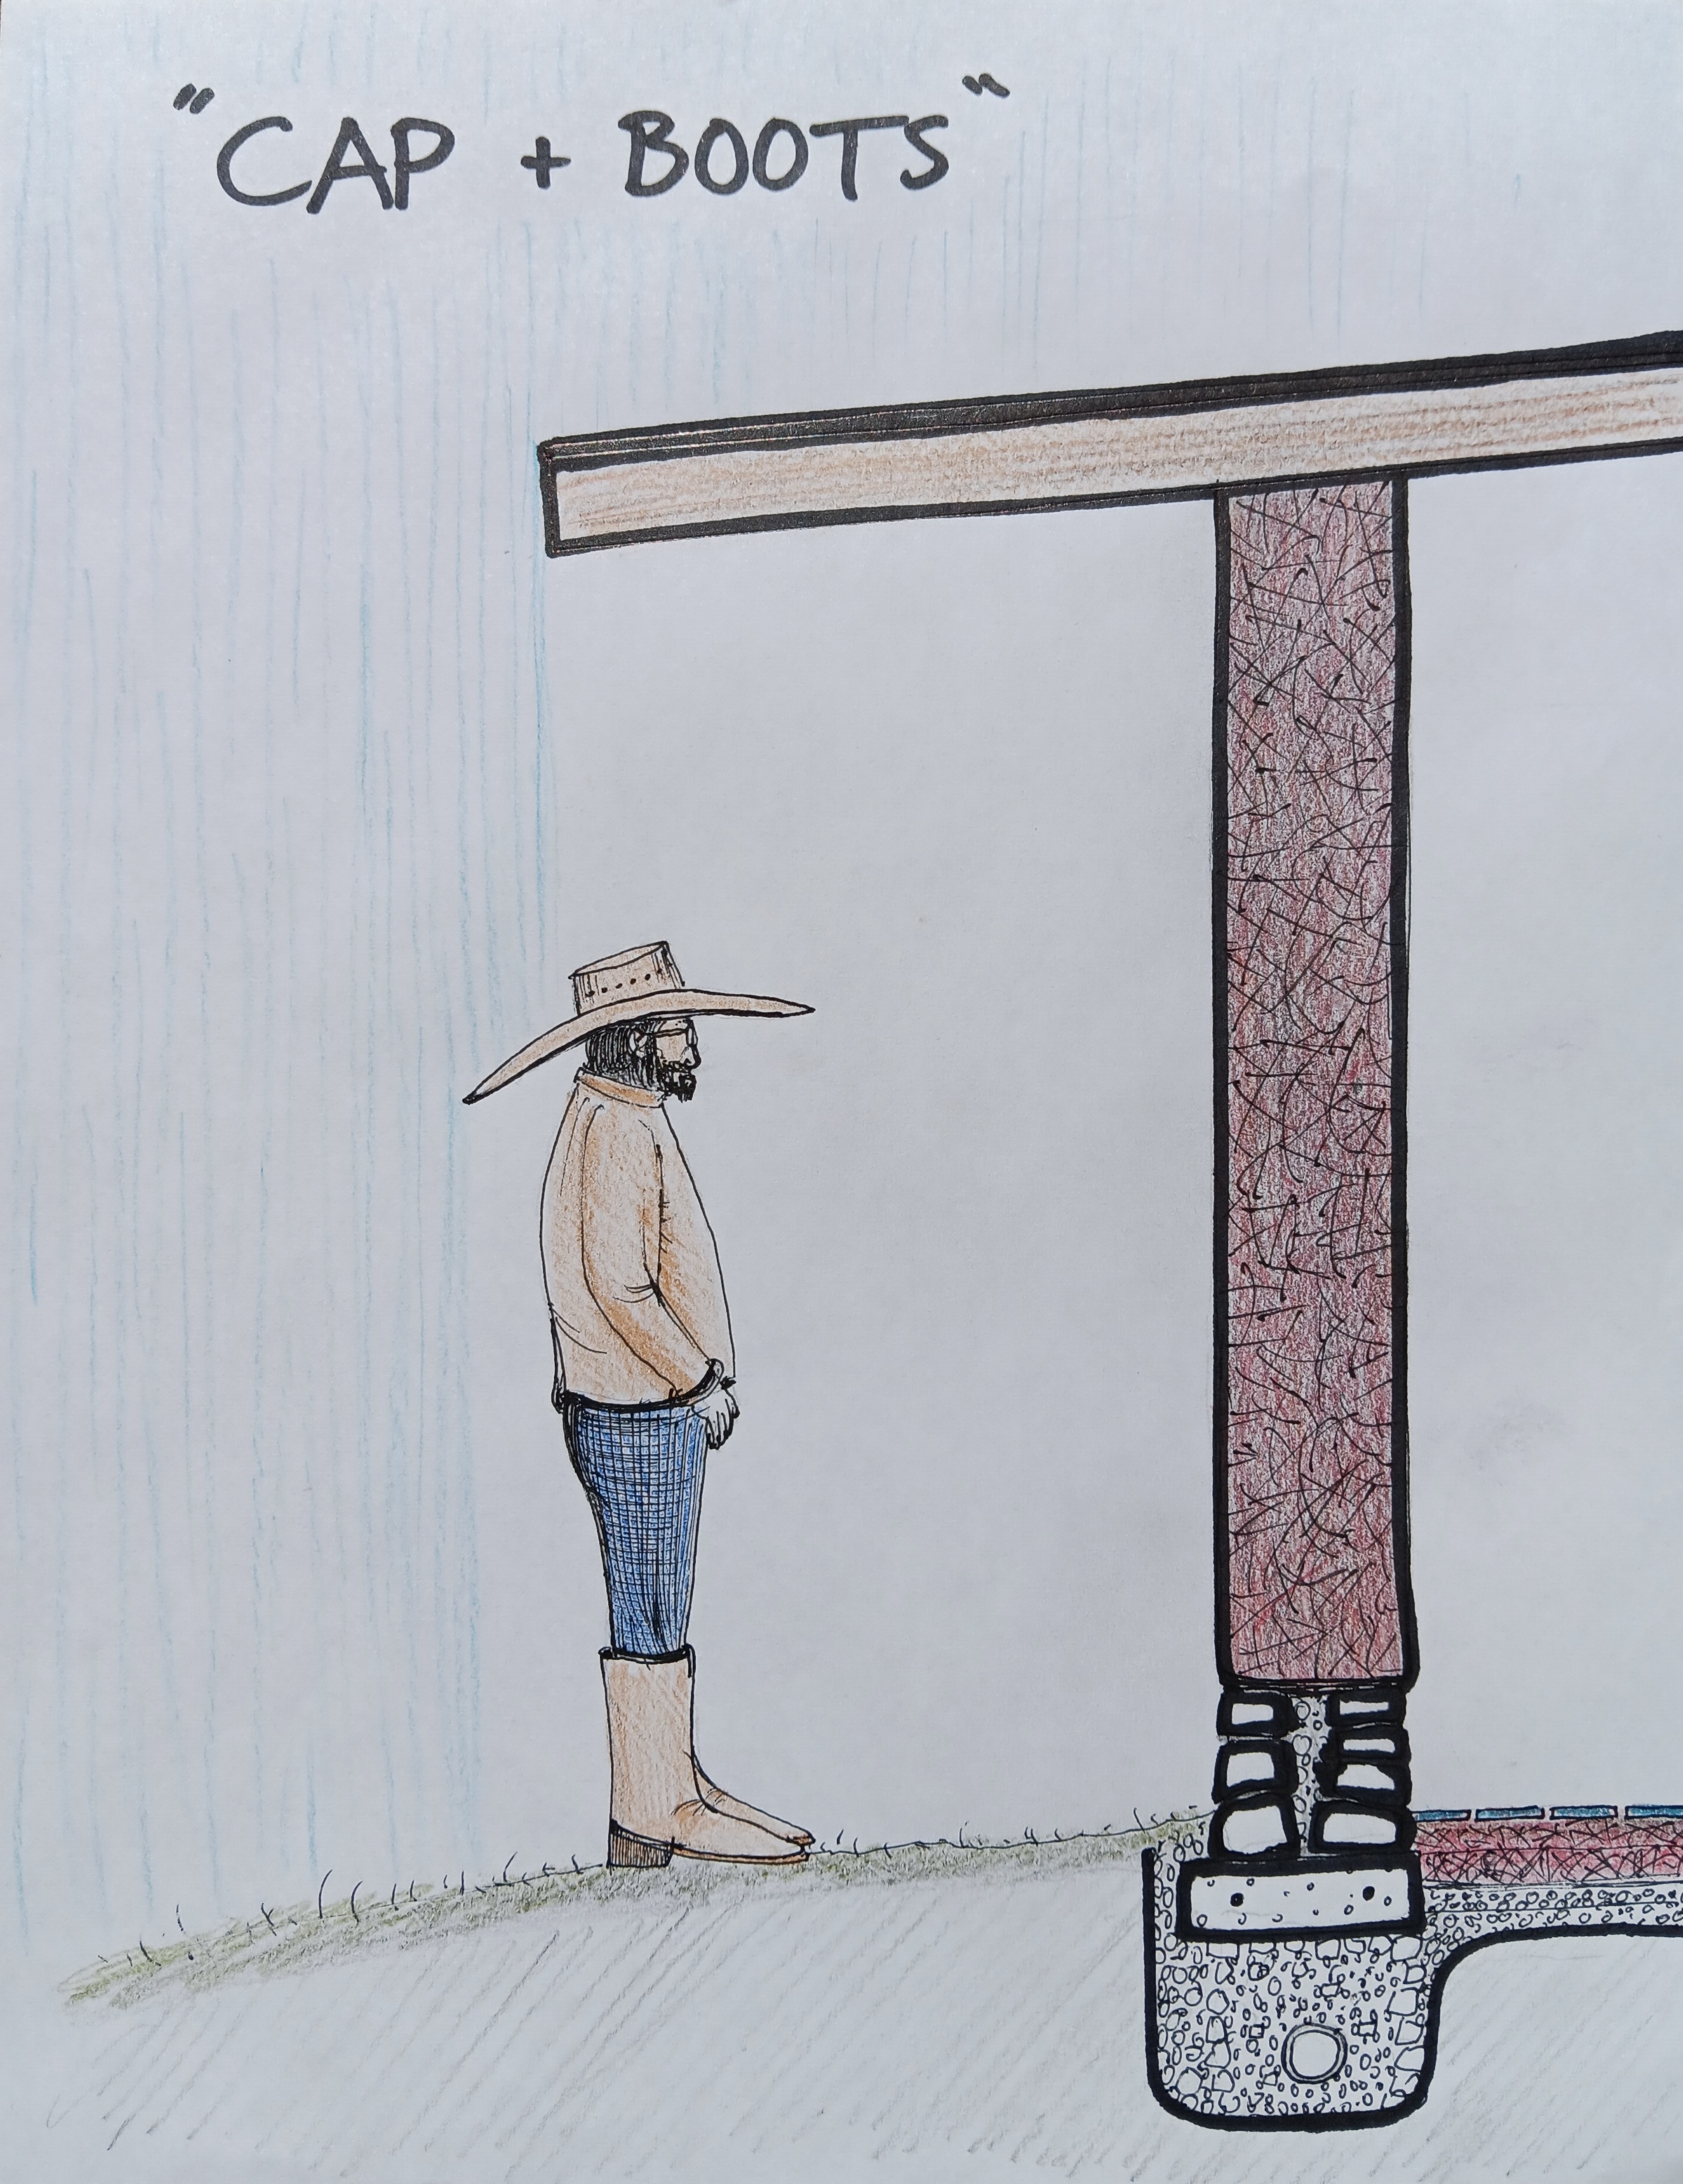
Illustration by Jamey Scott Breinberg (2026)
What worked
Before discussing what I’d change, it’s important to say what worked. Overall, the house itself was not a failure, just my “raincoat” experiment. It is a massive work of art and remains a valuable, habitable, and much-loved experiment. It was truly an unforgettable pleasure to experience living within this giant sculpture, unlike any other house I have ever seen. Besides its sheer beauty, ecological and economic advantages, fire- and earthquake-resistant qualities, etc., the basic earthen construction was remarkably effective at creating a comfortable interior environment. The straw-rich mixture produced relatively lightweight walls with good insulating properties, which was particularly appropriate for a tropical climate where the enormous thermal mass in most earthen (and concrete/cinderblock) buildings would have retained way too much heat throughout the night, potentially requiring energy-intensive air conditioning.
The sculptural forms worked. The solid foundation worked—no cracks despite being built on expansive clay soil. The reinforced framework worked and made it fairly quick and easy to build. The bottle-wall elements worked aesthetically. The ventilation strategy worked great much of the year. And, once we eventually added a roof, the underlying earthen structure became much easier to protect and maintain. Perhaps most importantly, the experiment taught me things that I could not have learned simply by reading about earthen construction. That practical experience is what this article is really about. Here are the major lessons I’ve learned from this house…
Lesson #1: Don’t try to make a coating do the job of a roof
This is, by far, the biggest and most important lesson. I spent years trying to solve a problem that always had a remarkably simple solution. I wanted to eliminate the roof. There were plenty of good reasons why that seemed attractive. Roofs are expensive. They require structural support. In many places they require timber, which introduces issues of deforestation, termites, fire and maintenance. A roof also changes the appearance of a sculptural earthen building and makes it less aerodynamic and, therefore, more vulnerable to heavy windstorms. All the same beneficial qualities earth imparts to the walls could be extended to the roof, simplifying the construction and tying it all together into a single, self-enclosed, monolithic mass. I reasoned that if I could make the exterior of the building itself resistant to rain, why not eliminate the roof (generally the second most expensive component of an earthen structure) altogether? I investigated virtually every natural and synthetic material I could find: hydraulic lime, hydrated lime, cement, water glass, elastomeric coatings, specialty paints, sealants, oils, pine tar, microcrystalline wax, etc., and various combinations of the above.
I was essentially trying to invent a Gore-Tex jacket for a house: something that would keep liquid rainwater out while allowing water vapor to escape. The idea was logical. The problem was that a coating has to live on a substrate that moves. Earthen walls change dimension as their moisture content and temperature change. Small cracks are therefore difficult to eliminate completely. On a roofless structure in a tropical climate, those cracks become potential pathways forsignificant amounts of rainwater. Once water gets behind a surface coating, the coating can actually make the problem harder to see.
I’ve therefore come to a very different conclusion: Don’t ask a coating to do the job of a roof! A good roof doesn’t have to be perfectly waterproof, flexible, breathable, self-healing and compatible with a constantly moving earthen substrate. It simply keeps most of the rain off the wall–a much easier job.
Lesson #2: Build the roof first
If I could go back to the beginning, I would do something very different. I’d build the roof before building the earthen walls. This would have provided two enormous advantages. First, it would have protected the walls during construction. This turned out to be critical. Because of the size of the house, construction delays, and a shortage of helpers, the project took much longer than anticipated. I knew Costa Rica’s heavy rainy season generally arrived around September and October, but I underestimated how quickly the first substantial rains could become a problem.
Even though the mudding wasn’t quite finished, we hurried to protect the unfinished walls with a quick lime wash but it wasn’t nearly enough. The rain came down much more heavily than expected and washed away portions of the surface, damaged the smooth earthen finish, and saturated the walls. Eventually we covered the structure with tarps and plastic, but by then substantial damage had already occurred. A roof would have prevented much of this.
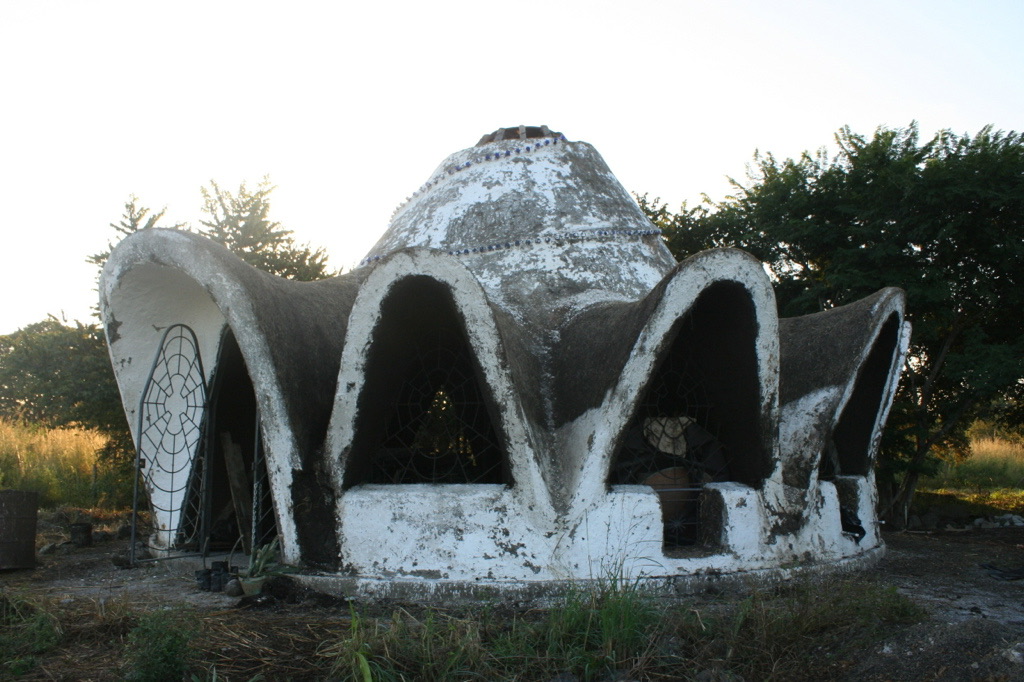
Second, the roof would have made construction dramatically more pleasant. In a hot tropical climate, a large roof is essentially a giant umbrella. It provides shade for the people building the house as well as protection for the walls. And once the building is finished, a generous roof creates shaded outdoor living space. The traditional tropical veranda isn’t merely an aesthetic feature—it is an extremely effective way of protecting walls and openings from sun and wind-driven rain. I spent years looking for a technological substitute for the roof. In retrospect, the roof itself was the technology I needed. An “umbrella” proved to be much better than a “raincoat”.
Lesson #3: Reinforcement is useful—but I used more steel than necessary
The metal framework served several important purposes. It provided reinforcement. It acted both as formwork and asscaffolding while the wet earth was being applied. And it provided a measure of security in case the earthen material became saturated. That last function turned out to be particularly important when portions of the building were eventually damaged by water. So I don’t regret using reinforcement but bamboo or some other natural material would have sufficed. What I question now is how much steel I used and where I used it. The steel added expense, possibly more labor, and embodied energy that increased the overall carbon footprint. Working with rebar and wire ties that get sharp when cut is also unpleasant and potentially dangerous, particularly once everything begins rusting. Today I would investigate a much lighter hybrid framework using natural materials wherever their durability could be assured.
But there’s an important story behind why I used steel in the first place. My original plan called for bamboo and “bejuco”—the vines that hang from trees and look like something Tarzan would swing from.
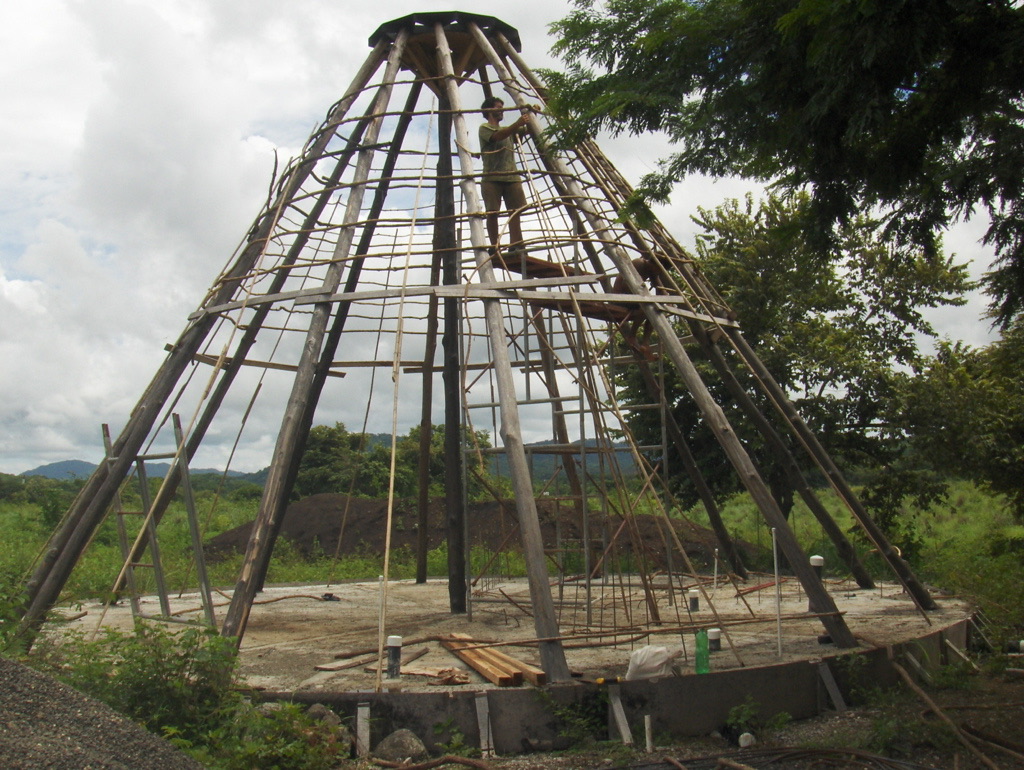
The cone framed with teak poles, “bejuco”, and bamboo before realizing just how infested with termites it was and replacing the latter two with rebar.
Unfortunately, the bamboo available to me was infested with termites. Faced with termite-infested bamboo or steel, I chose steel. I still think that was the correct decision. Sustainability isn’t simply a matter of choosing the most natural-looking material. A supposedly sustainable material that is already being eaten by termites inside your wall isn’t necessarily a sustainable structural solution. Next time, I’ll investigate finding a source of properly treated bamboo or other naturally flexible yet durable materials, or I’ll treat it myself rather than use rebar. I would consider supplementing parts of the frame with steel where its additional strength was actually needed—for example, in cantilevers or other structurally demanding areas.
Lesson #4: The wall material matters more than I realized
Though I knew it wasn’t ideal for earth building, I made it a point to use the expansive clay soil with its relatively high silt content that was excavated 80cm deep (as per the engineer’s instructions) from the building footprint for the foundation, rather than pay to have truckloads of other earth and sand delivered—a much more expensive and less sustainable solution.

Almost the entire house was mudded using this pile of earth that was excavated 80cm deep (as per the engineer’s instructions) from the footprint of the building for the foundation.
As mentioned earlier, our mixture deliberately contained a substantial amount of chopped straw to drastically reduce the thermal mass in most earthen buildings because, in the tropics, it’s best to have a relatively lightweight, insulating wall that doesn’t retain heat all night long. However, straw-rich walls are much more vulnerable to persistent/trapped moisture.
For the next house, I would spend considerably more time characterizing and testing the local soil and determining whether some form of stabilization would improve its resistance to moisture. I would not, however, simply assume that adding a particular percentage of lime or cement is universally appropriate. The correct formulation depends on the actual soil and the desired properties of the finished material. That’s another lesson from this project: Test the material you’re actually going to build with, not the soil described in a book, and not the soil used successfully somewhere else. Your soil, your climate, and your wall design.
Lesson #5: I underestimated the importance of a compatible exterior plaster
Because hydraulic lime was recommended to me by a respected authority on the subject as a way of protecting an unroofed earthen structure in a seasonally damp climate, I initially thought it would be an excellent solution. That’s what I used for the smaller, roofless earthen home I built in northern California. I now view that decision much more cautiously.
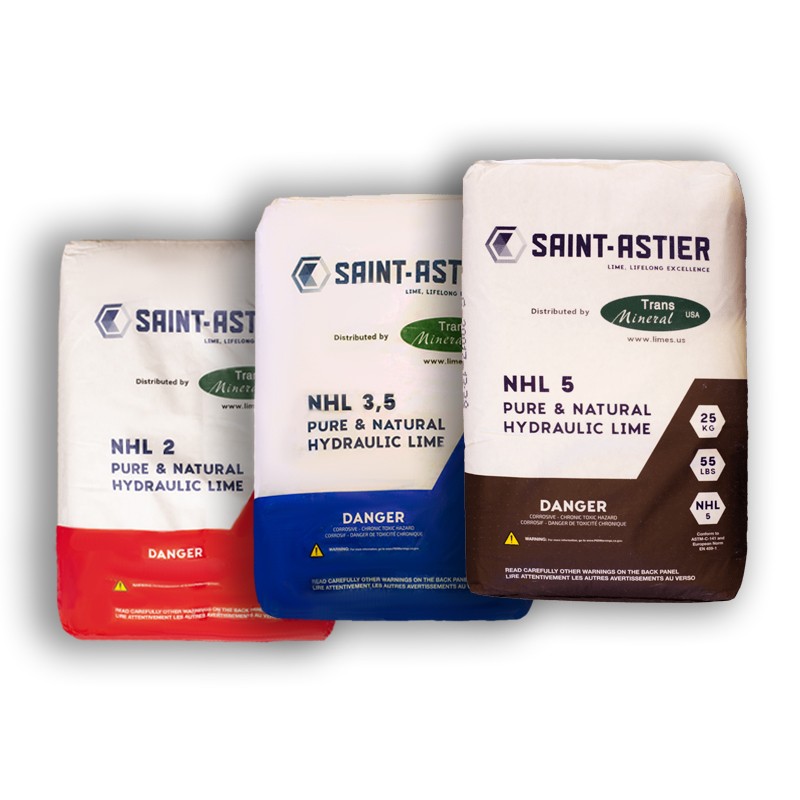
Hydraulic lime has legitimate advantages. It sets faster, develops greater early strength and can resist erosion better than ordinary hydrated lime. But an earthen wall is not stone. The substrate moves. The surface moves. Temperature and moisture fluctuate. A very hard plaster can therefore create problems if it doesn’t accommodate the natural movement of the earthen wall.
A permanent waterproof shell sounds great in theory but I now think using an exterior plaster as a sacrificial layer that needs occasional maintenance is a safer and more forgiving approach, so long as it’s periodically repaired before a small problem becomes a big one. This changes the design philosophy completely. For an earthen building, I think that is a much healthier philosophy. Predictable, gentle maintenance beats delayed catastrophic repair.
Lesson #6: Too many protective layers can become counterproductive
Because hydraulic lime wasn’t readily available locally, I attempted to create a homemade hydraulic-lime substitute by adding cement to hydrated lime. Unfortunately, while I was busy applying the plaster, my well-meaning helpers changed the proportions without telling me, doubling the amount of cement. I didn’t discover this until later. The problem is that the more cement added, the less the rendering is able to “breathe”, meaning expel excess water vapor.
Also, because the local hydrated lime appeared extremely soft and chalk-like, I was concerned that paint would not adhere properly. I therefore applied sodium silicate, or “water glass,” as a primer to harden and consolidate the surface. It worked very well for that purpose but it also added another vapor-inhibiting layer. The final system consisted of a metal-reinforced earth-straw mixture covered with a lime/cement plaster coated first with water glass and then multiple coats of elastomeric paint, further inhibiting the amount of water vapor able to penetrate through the wall.
At the time, I thought I was creating a sophisticated weatherproof yet breathable wall. Looking back, I see that I was progressively reducing the wall’s ability to exchange moisture while simultaneously depending on that moisture exchange to keep the earthen wall healthy. The lesson isn’t that water glass or elastomeric paint is inherently “bad.” It’s that every layer has to be considered as part of the entire wall assembly. A material can be excellent in isolation and still be inappropriate when combined with several other materials.
Lesson #7: Bottle walls need to be designed around moisture and thermal movement
I still love the appearance of the double spiral of blue glass-bottles in the house. There is nothing inherently wrong with incorporating bottles into earthen walls, and bottle walls have a long history in natural building. My big mistake was allowing the bottles to penetrate through the exterior surface of the roofless earthen wall. The exposed glass became extremely hot in direct sunlight while the surrounding earth remained relatively cool. I began seeing hairline cracks around the bottles in the exterior coating and they kept returning no matter how many times I filled them with more paint.
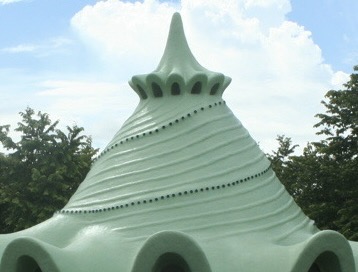
Exterior view of double spiral of the numerous cobalt blue bottles protruding through the exterior wall.
At first I blamed the paint. Eventually I concluded that the interface between the hot bottles and the cooler earthen wall was creating repeated movement and moisture-related stresses that the coating couldn’t accommodate indefinitely. It was like a steady fountain of condensation.

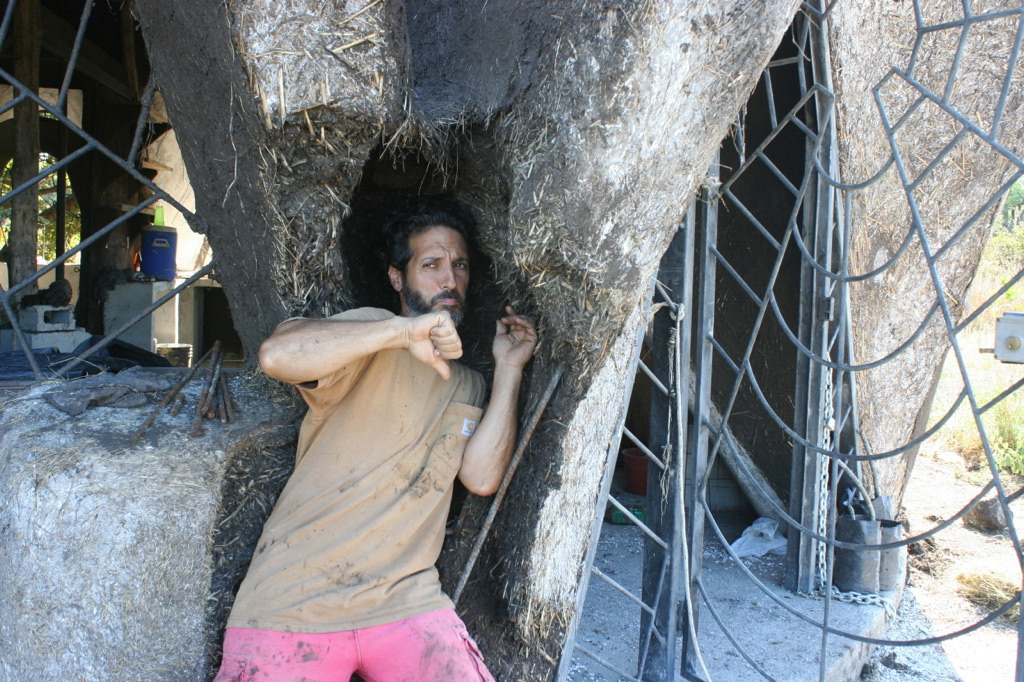
Chiseling away the lime-cement-sand plaster to remove and replace the degraded mud-straw walls damaged by the condensation.
Normally, a small crack in an earthen exterior isn’t necessarily disastrous. Without a roof, however, that crack is an invitation to the rain. And that’s exactly what happened. As the gods of crappy timing had planned things, right before my family and I were about to move in, I had to leave the country for a couple of weeks just as the rainy season began so I was unable to monitor and potentially cover the structure before all those hairline cracks reappeared and expanded and absorbed the rainwater like a sponge while I was away. By the time I returned, the damage was extensive. The straw-rich earth in portions of the conical wall had become saturated and begun to decompose.
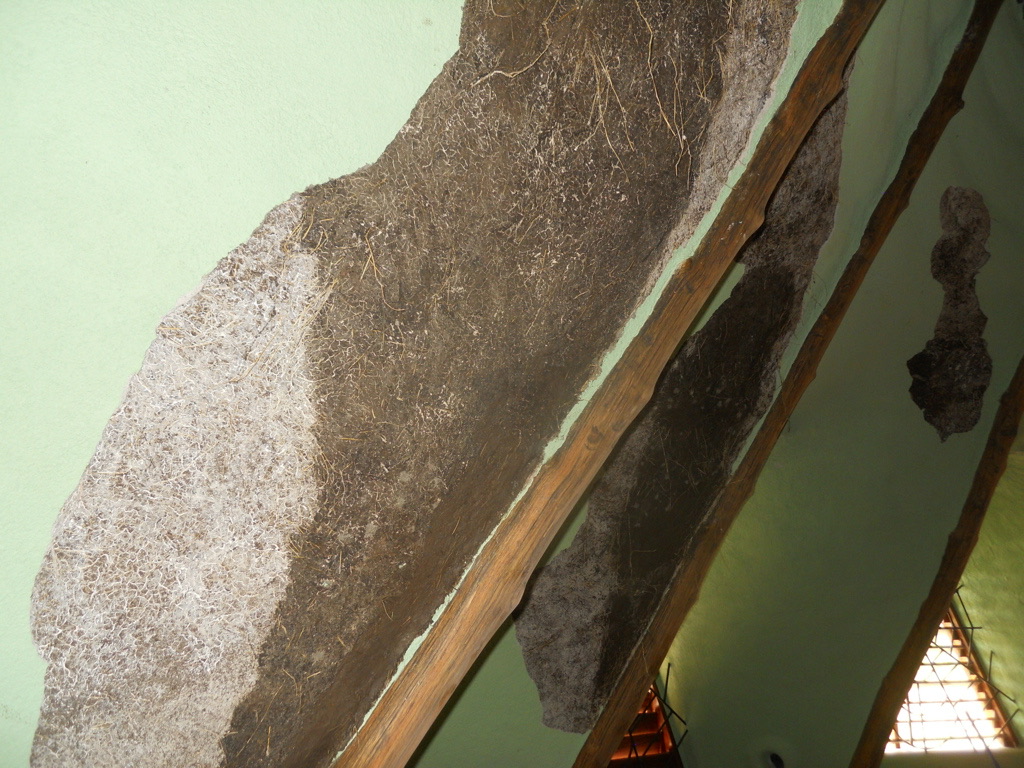
Some of the damage seen inside the structure after removing the painted lime plaster that had separated from the mud-straw walls.
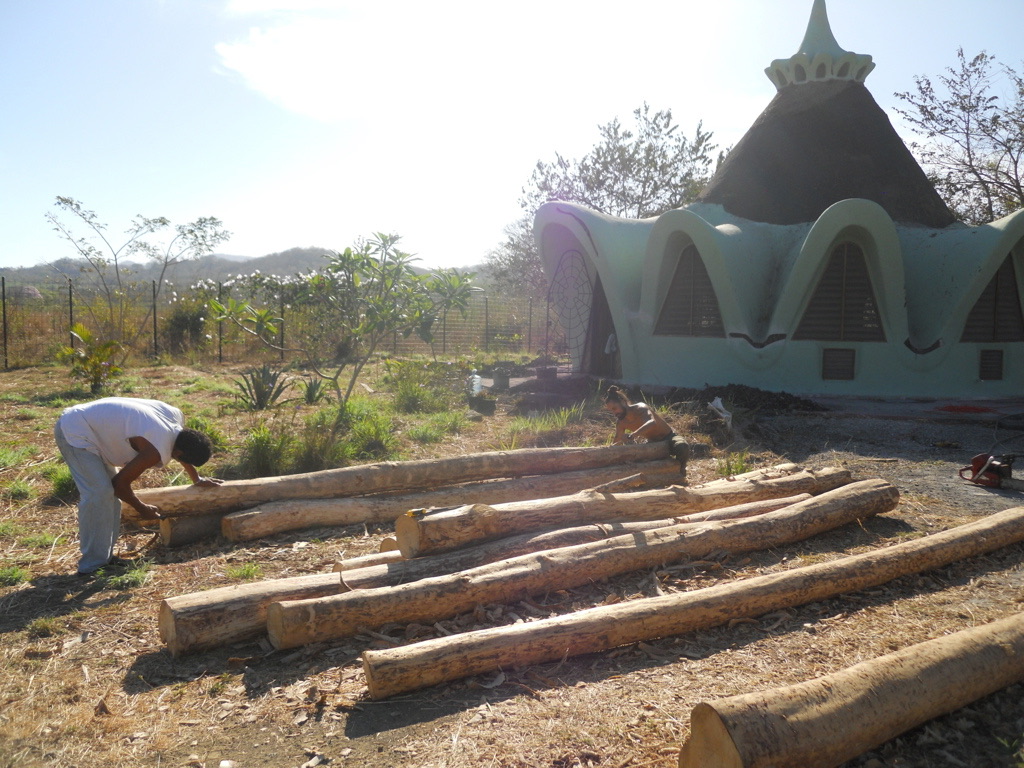
View of the exterior of the house after removing large sections of lime-cement-plaster and repairing the mud-straw walls.
Other than some slight rust, the metal frame was fine, but I ultimately had to tear down and rebuild substantial portions of the affected walls and install a conventional roof. Thanks to the land, I didn’t have to pay anything for new earth and dried grass (just the labor to rebuild them), and my garden loved the discarded, compost-rich material. Still, that was an extremely disappointing experience (to put it mildly), but it taught me an important lesson: Don’t create numerous potential water-entry points in an earthen wall and then depend on a surface coating to keep them permanently sealed. With a generous roof and overhangs, I would be much less concerned about using bottles. Without a roof, I wouldn’t do it again.
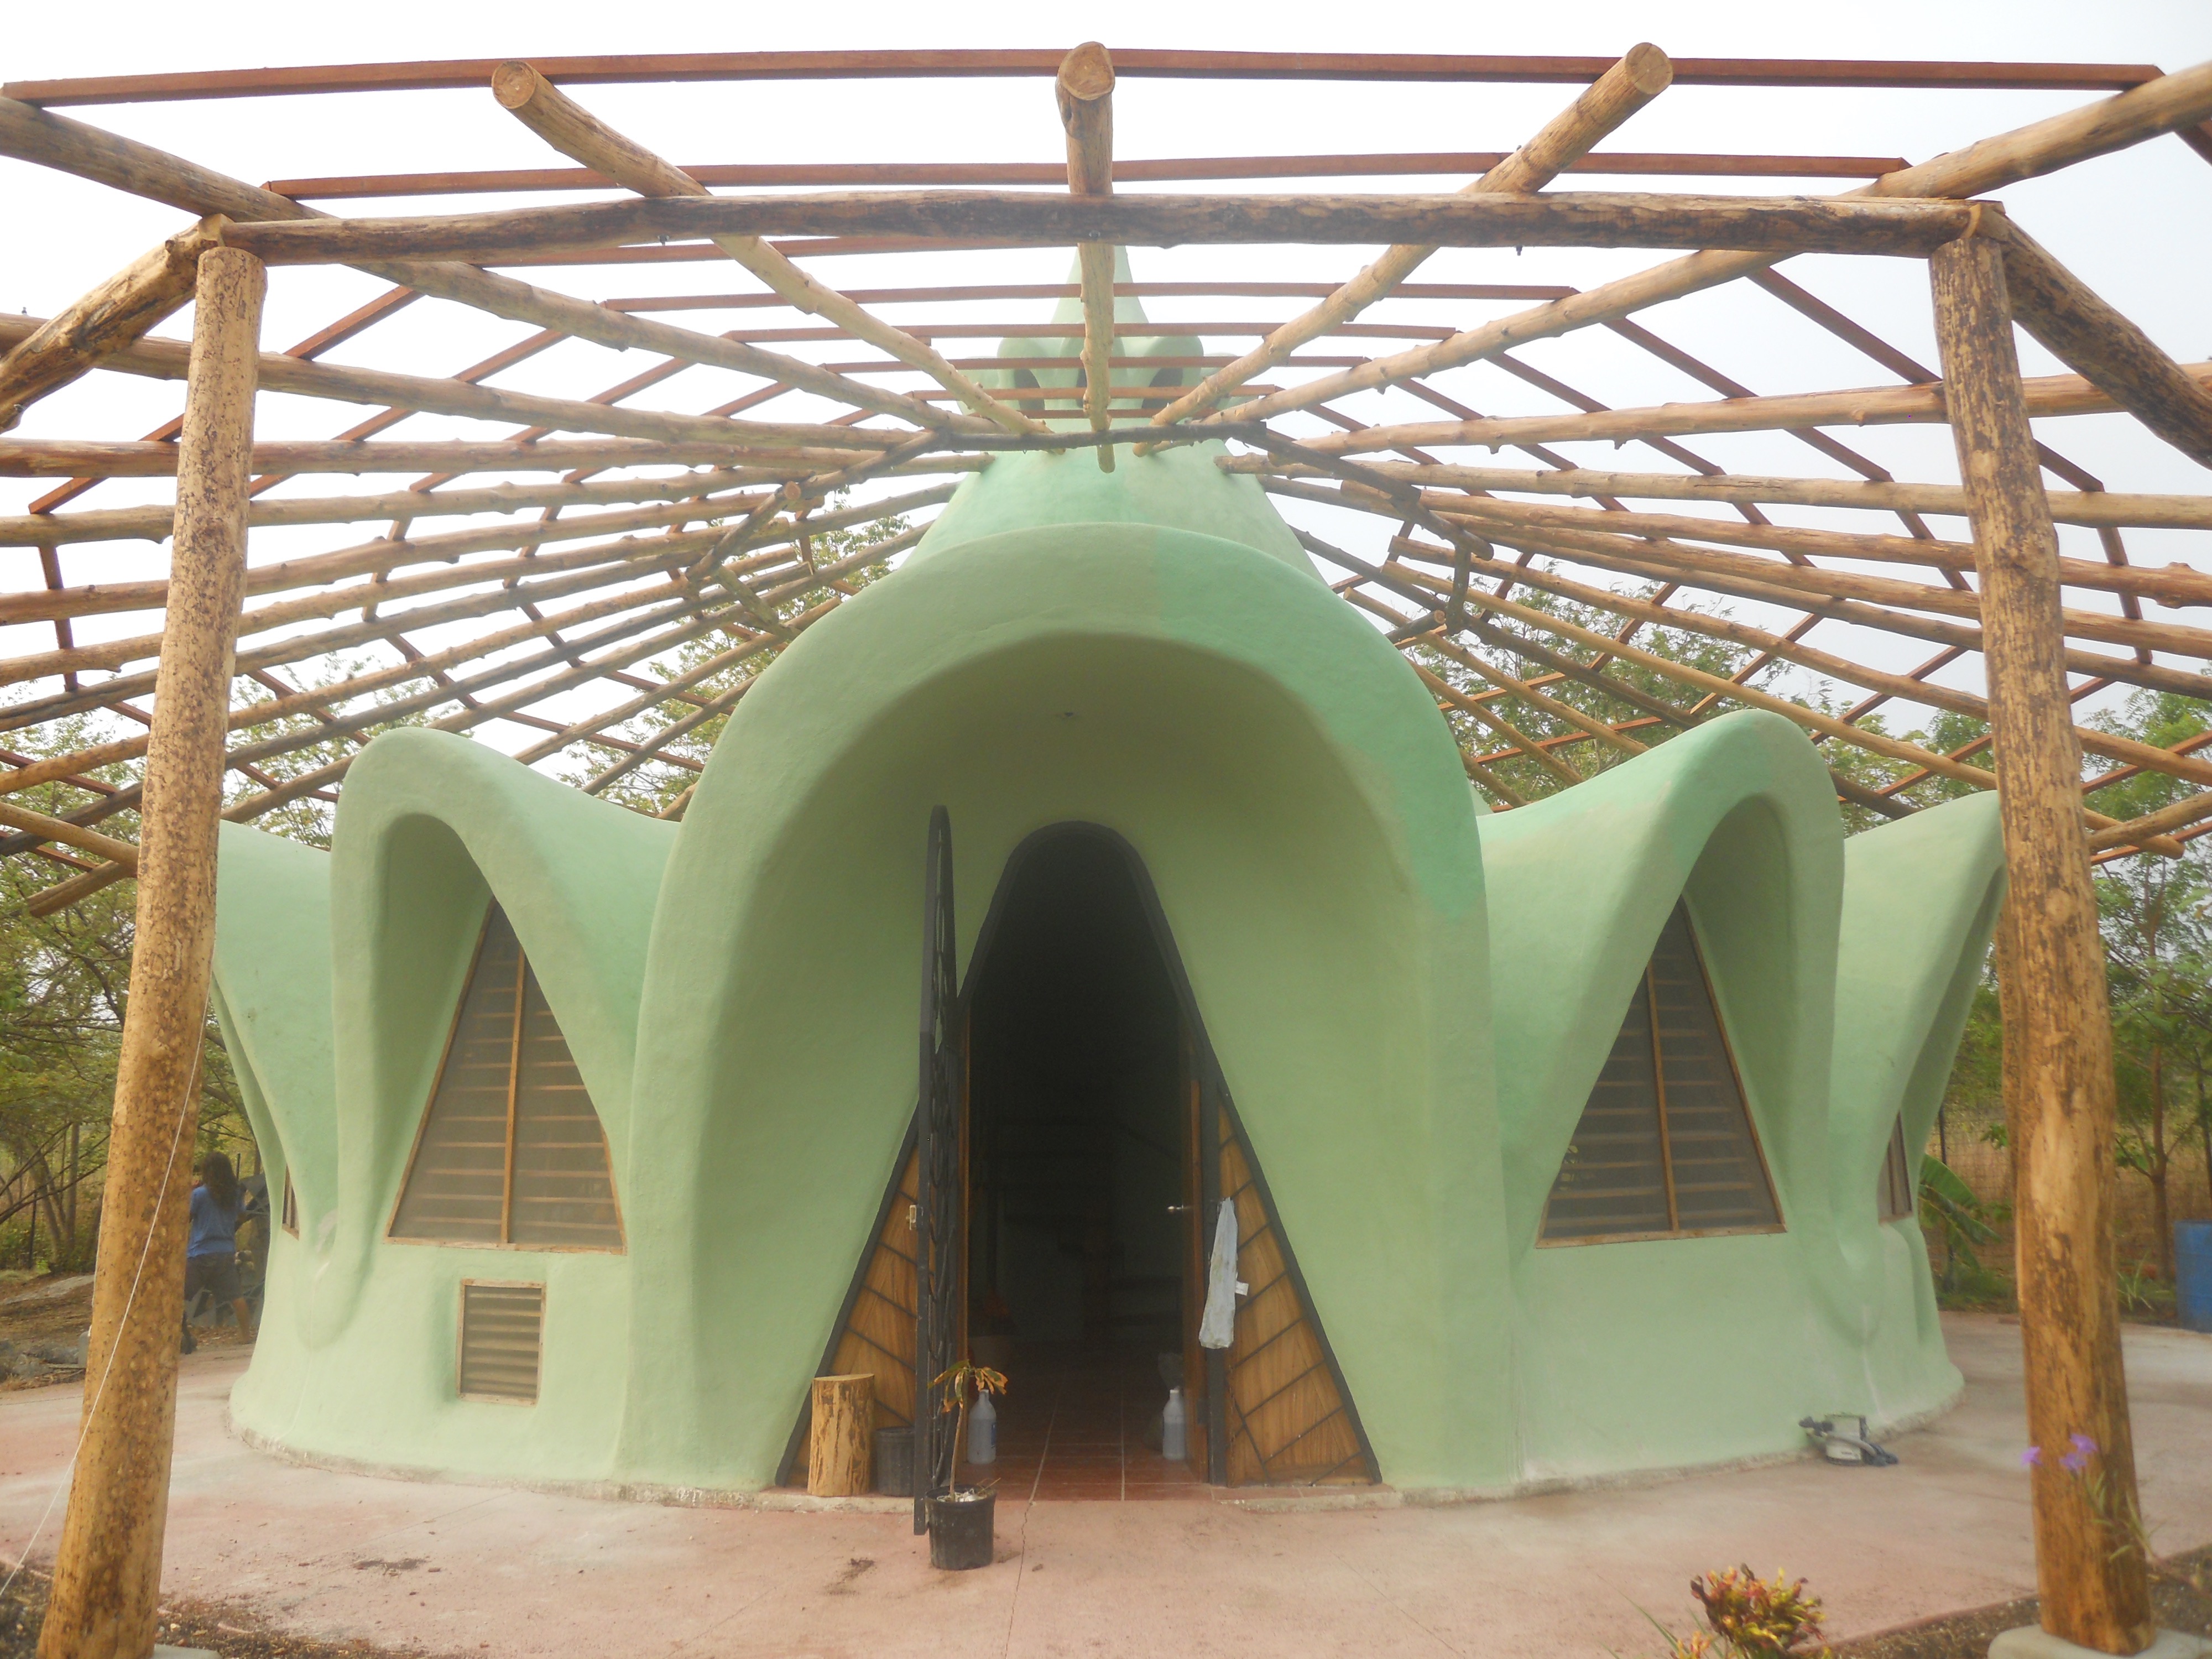
Teak pole “umbrella” frame (not including cupola)
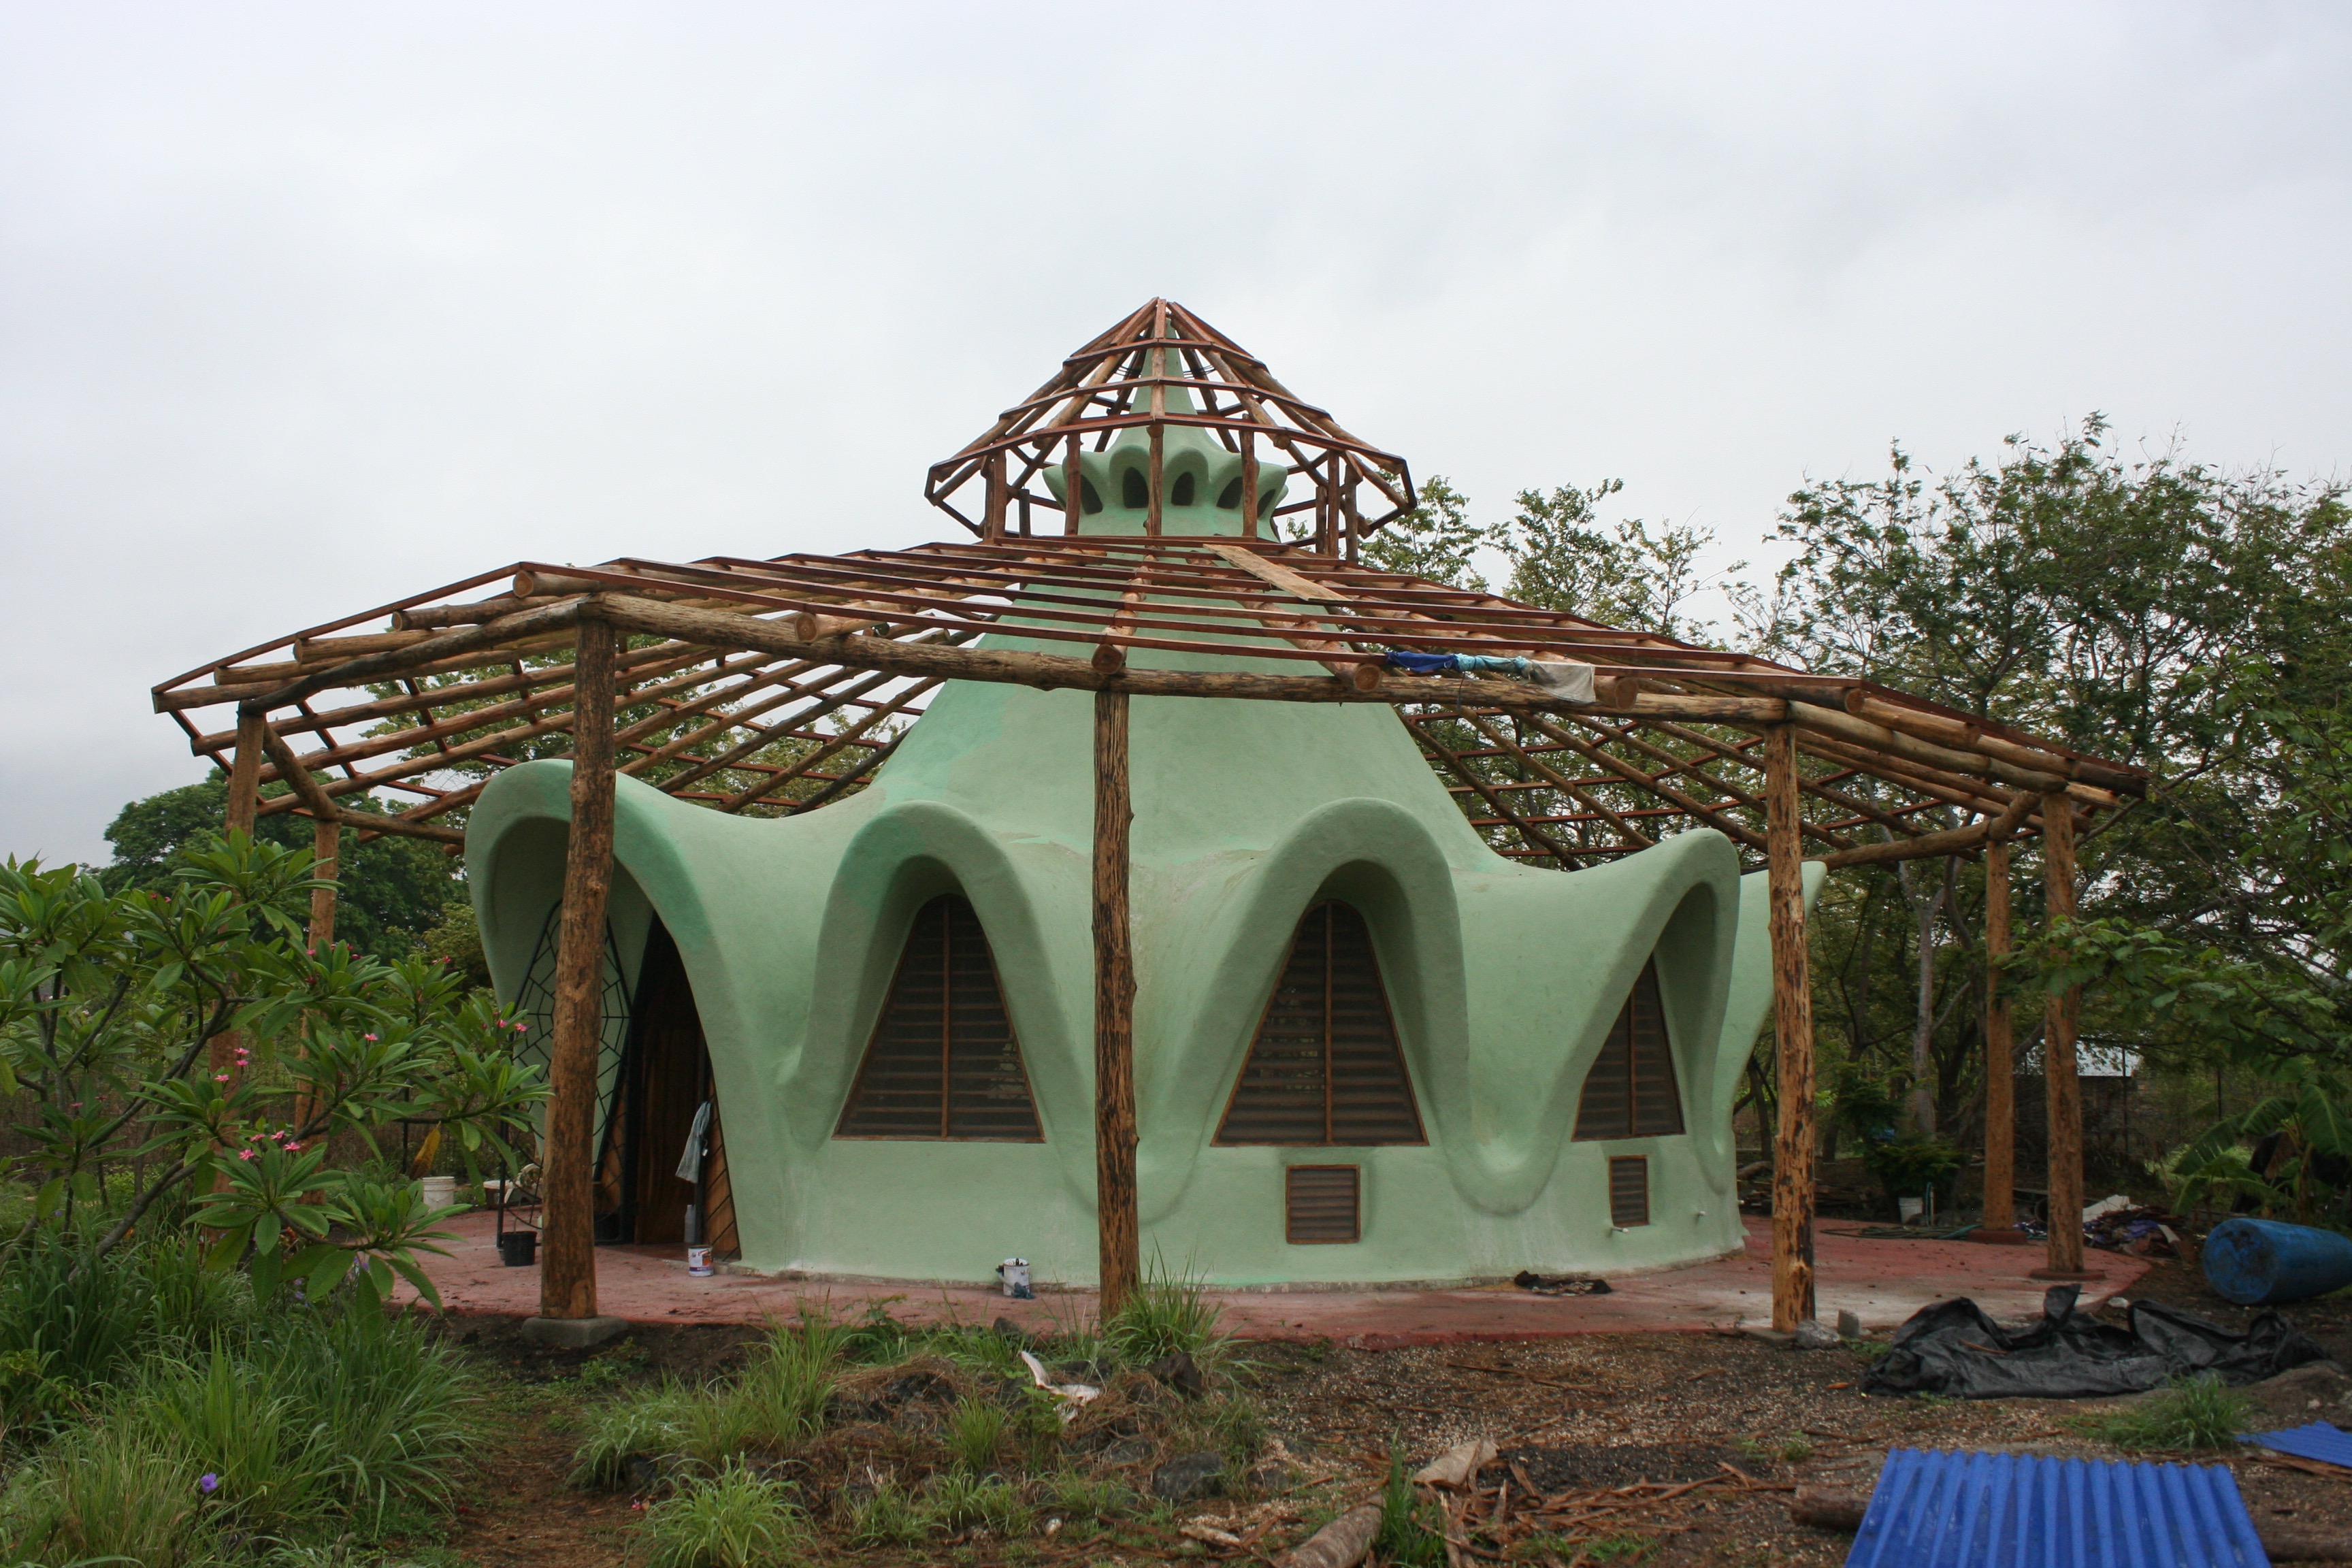
Teak pole “umbrella” frame (including cupola)
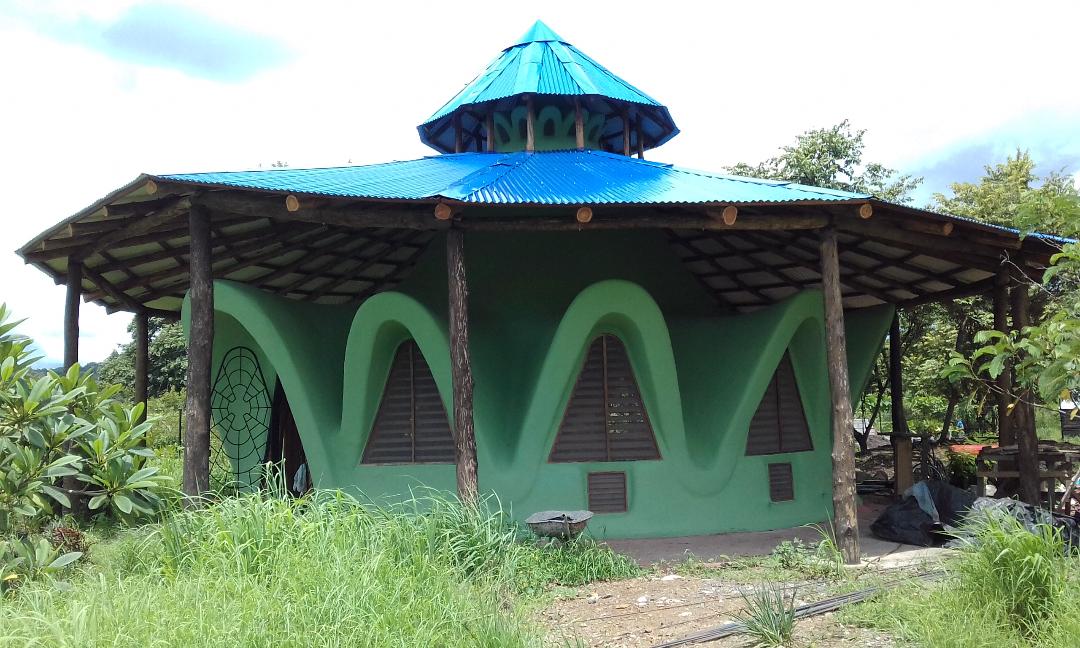
Teak pole “umbrella” frame (including cupola) sheathed with sheets of blue enameled corrugated metal.
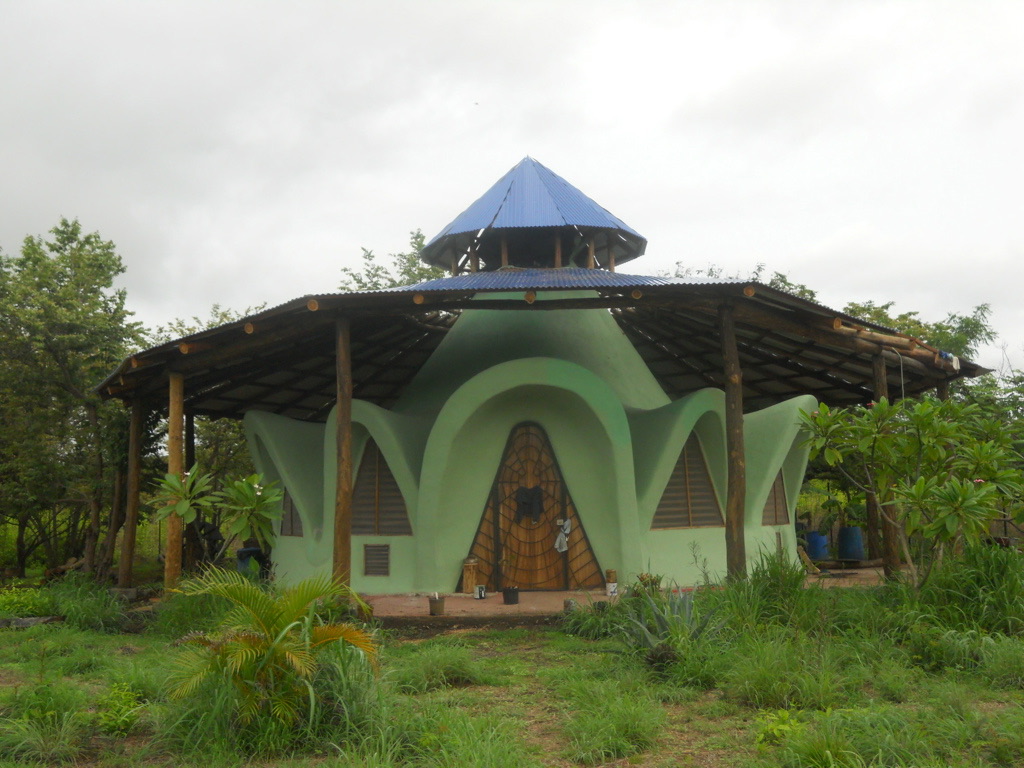
Entry view of completed teak pole “umbrella” frame (including cupola) sheathed with sheets of blue enameled corrugated metal. (These photos were taken before the arch-shaped steel pipes were added as cross-bracing to provide additional wind resistance.)
Lesson #8: Design for the climate you actually have
Another mistake was assuming I understood Costa Rica’s weather well enough. I didn’t. I knew the rainy season existed. What I underestimated was the difference between knowing when the rainy season normally begins and knowing how rapidly a tropical downpour can overwhelm an unfinished earthen structure, particularly one with a high silt content. The lesson applies far beyond Costa Rica. Construction schedules need to be based on actual local weather patterns, not assumptions. If you’re building with earth, you don’t want to discover your climate’s capabilities by watching your walls dissolve.
An example of some of the most extensive damage that needed to be fixed due to the straw that rotted after being saturated and subsequently wrapped in plastic to protect what was left during the wet season.
Lesson #9: Windows aren’t just for ventilation
Before building the house, we lived in a cinder-block apartment where we almost never closed the windows because closing them only made the apartment hotter and stuffier. That’s why I designed our new home around large screened openings rather than conventional glass windows. Most of the time, this worked beautifully. The house was remarkably comfortable, and visitors frequently commented on how cool it felt compared with the outside temperature.
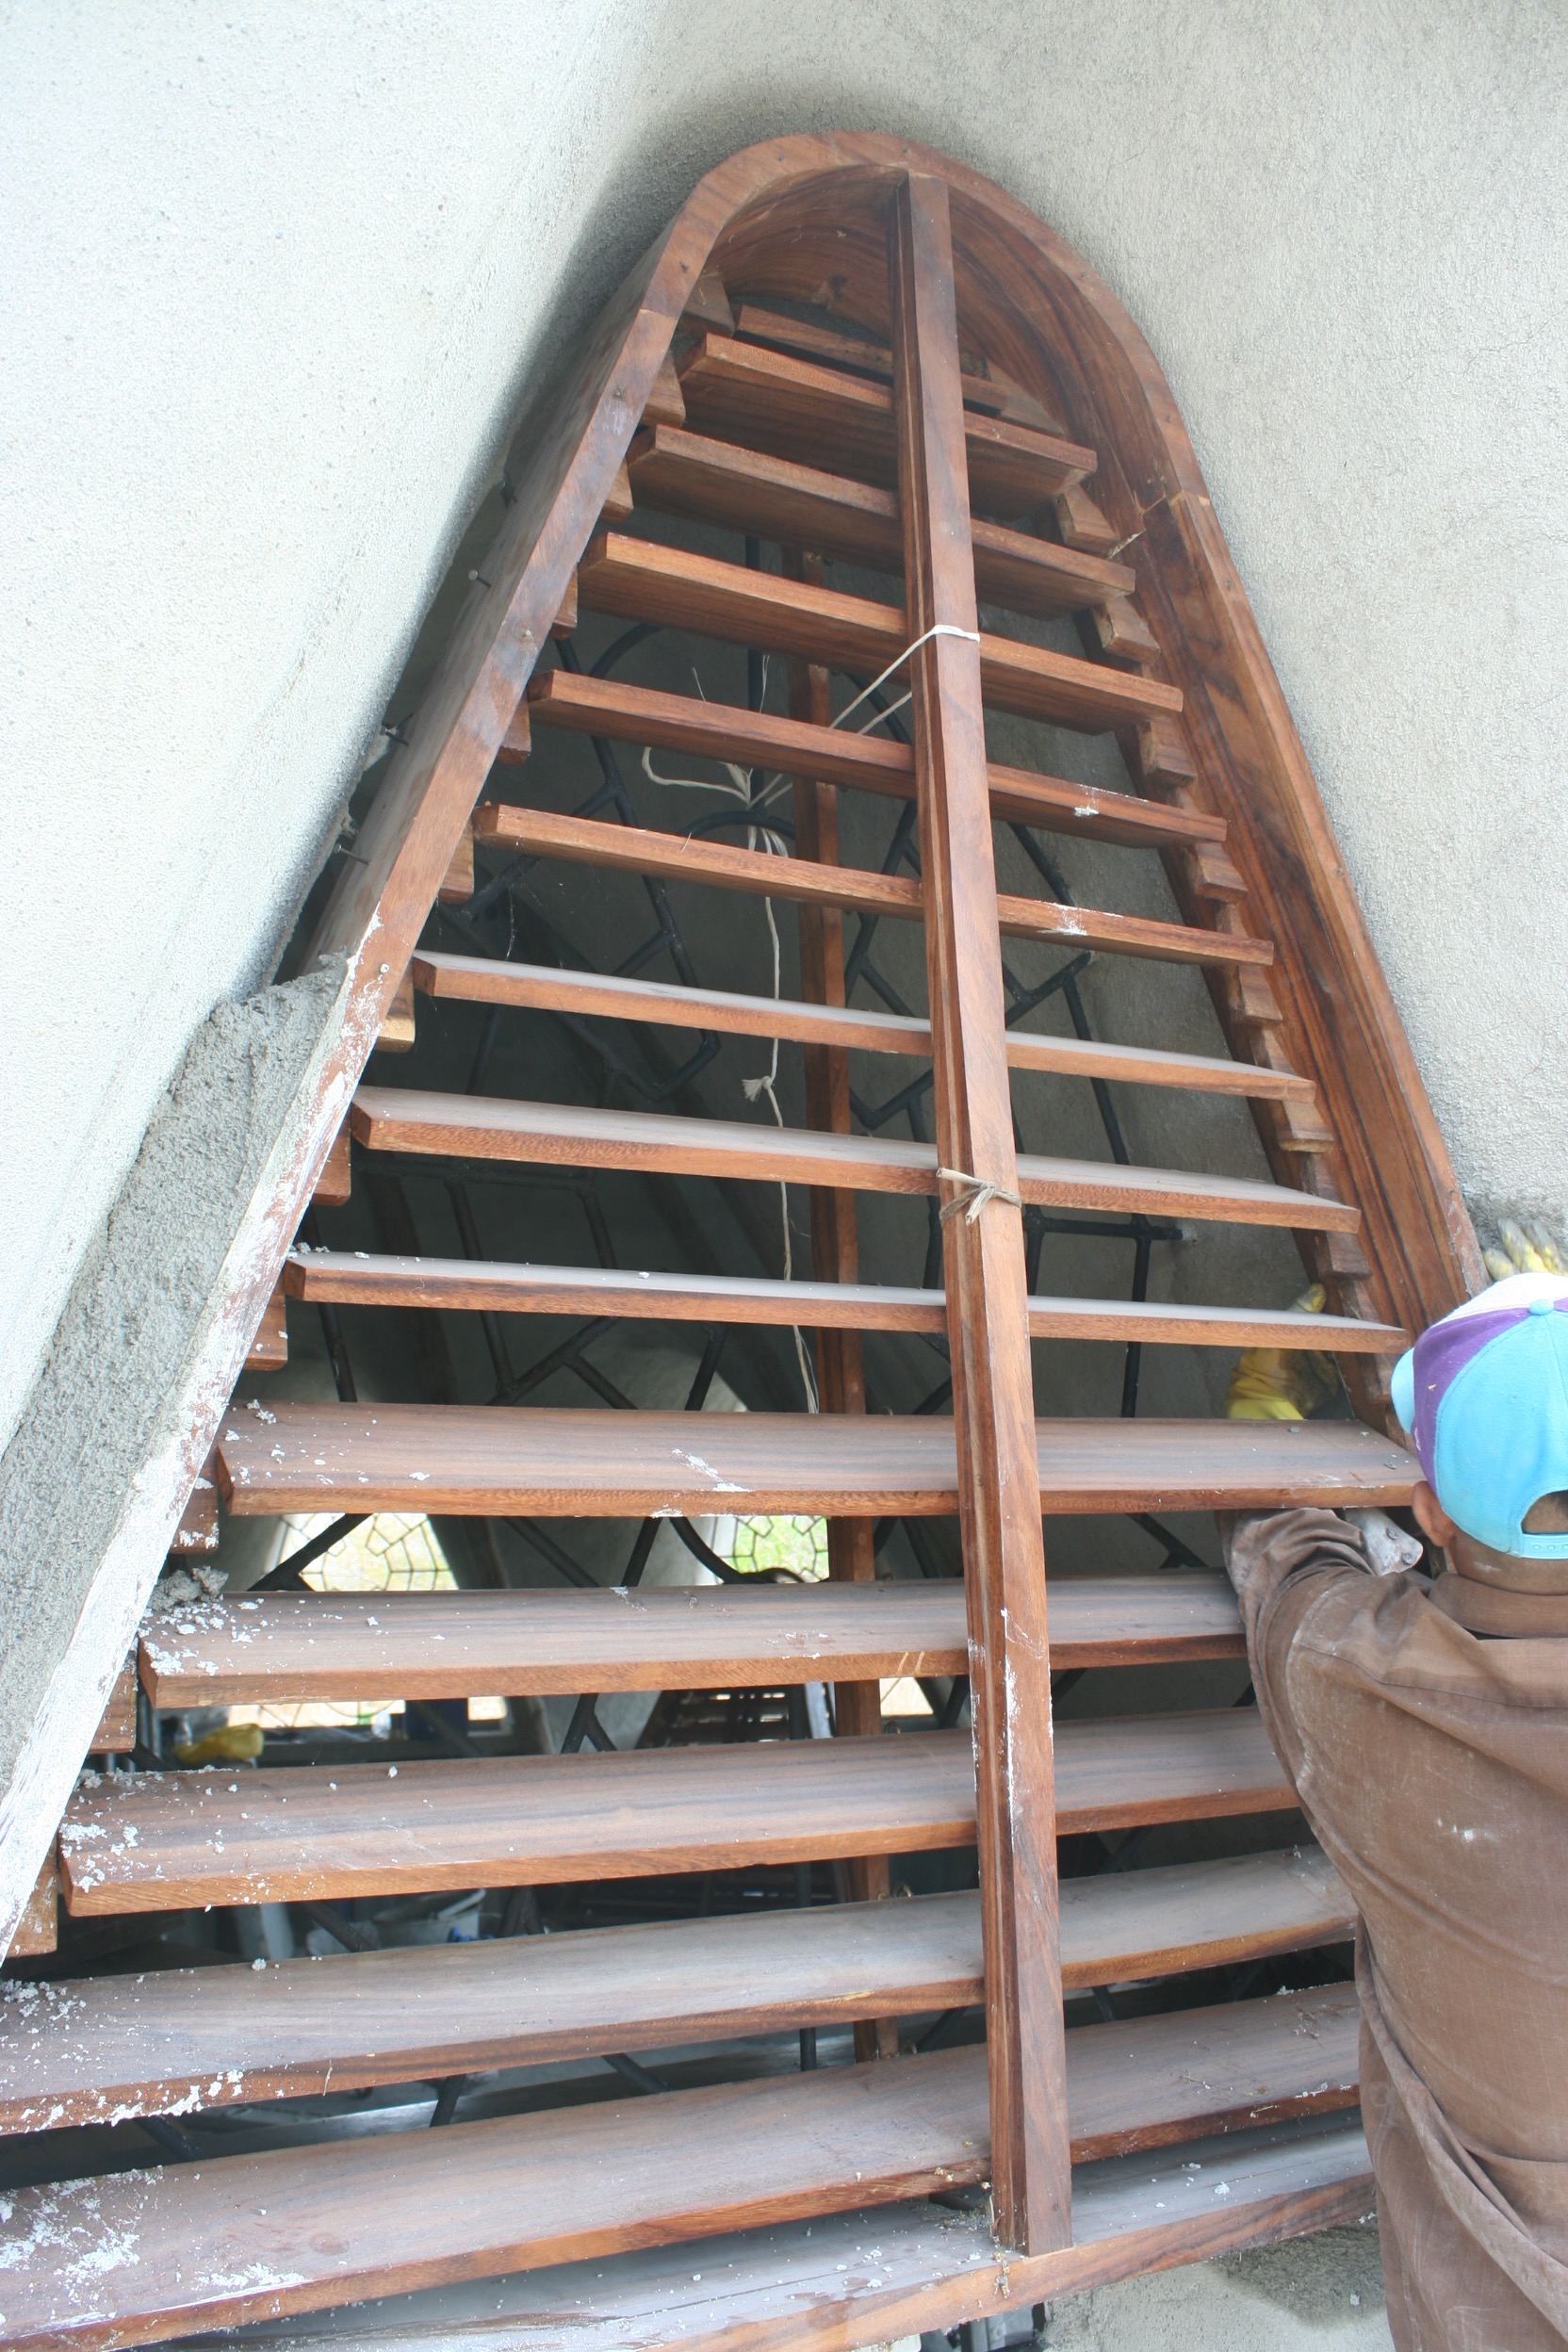
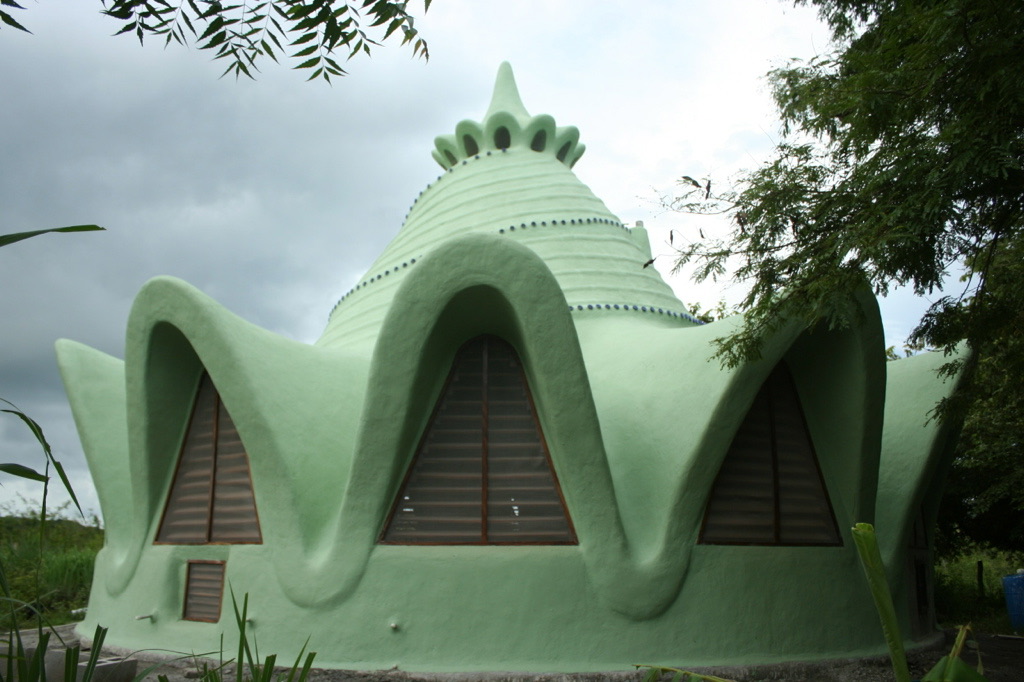
But during the hottest part of the year, the interior could still become uncomfortably warm. I had failed to appreciate one simple fact: When the outdoor air is hotter than the indoor air, ventilation can actually heat the building rather than cool it. Glass windows would have allowed us to close the house during the hottest part of the day and open it at night when the outside air cooled. So I learned that operable windows aren’t merely ventilation devices but also climate-control devices.
Lesson #10: Ordinary bug screens aren’t necessarily enough
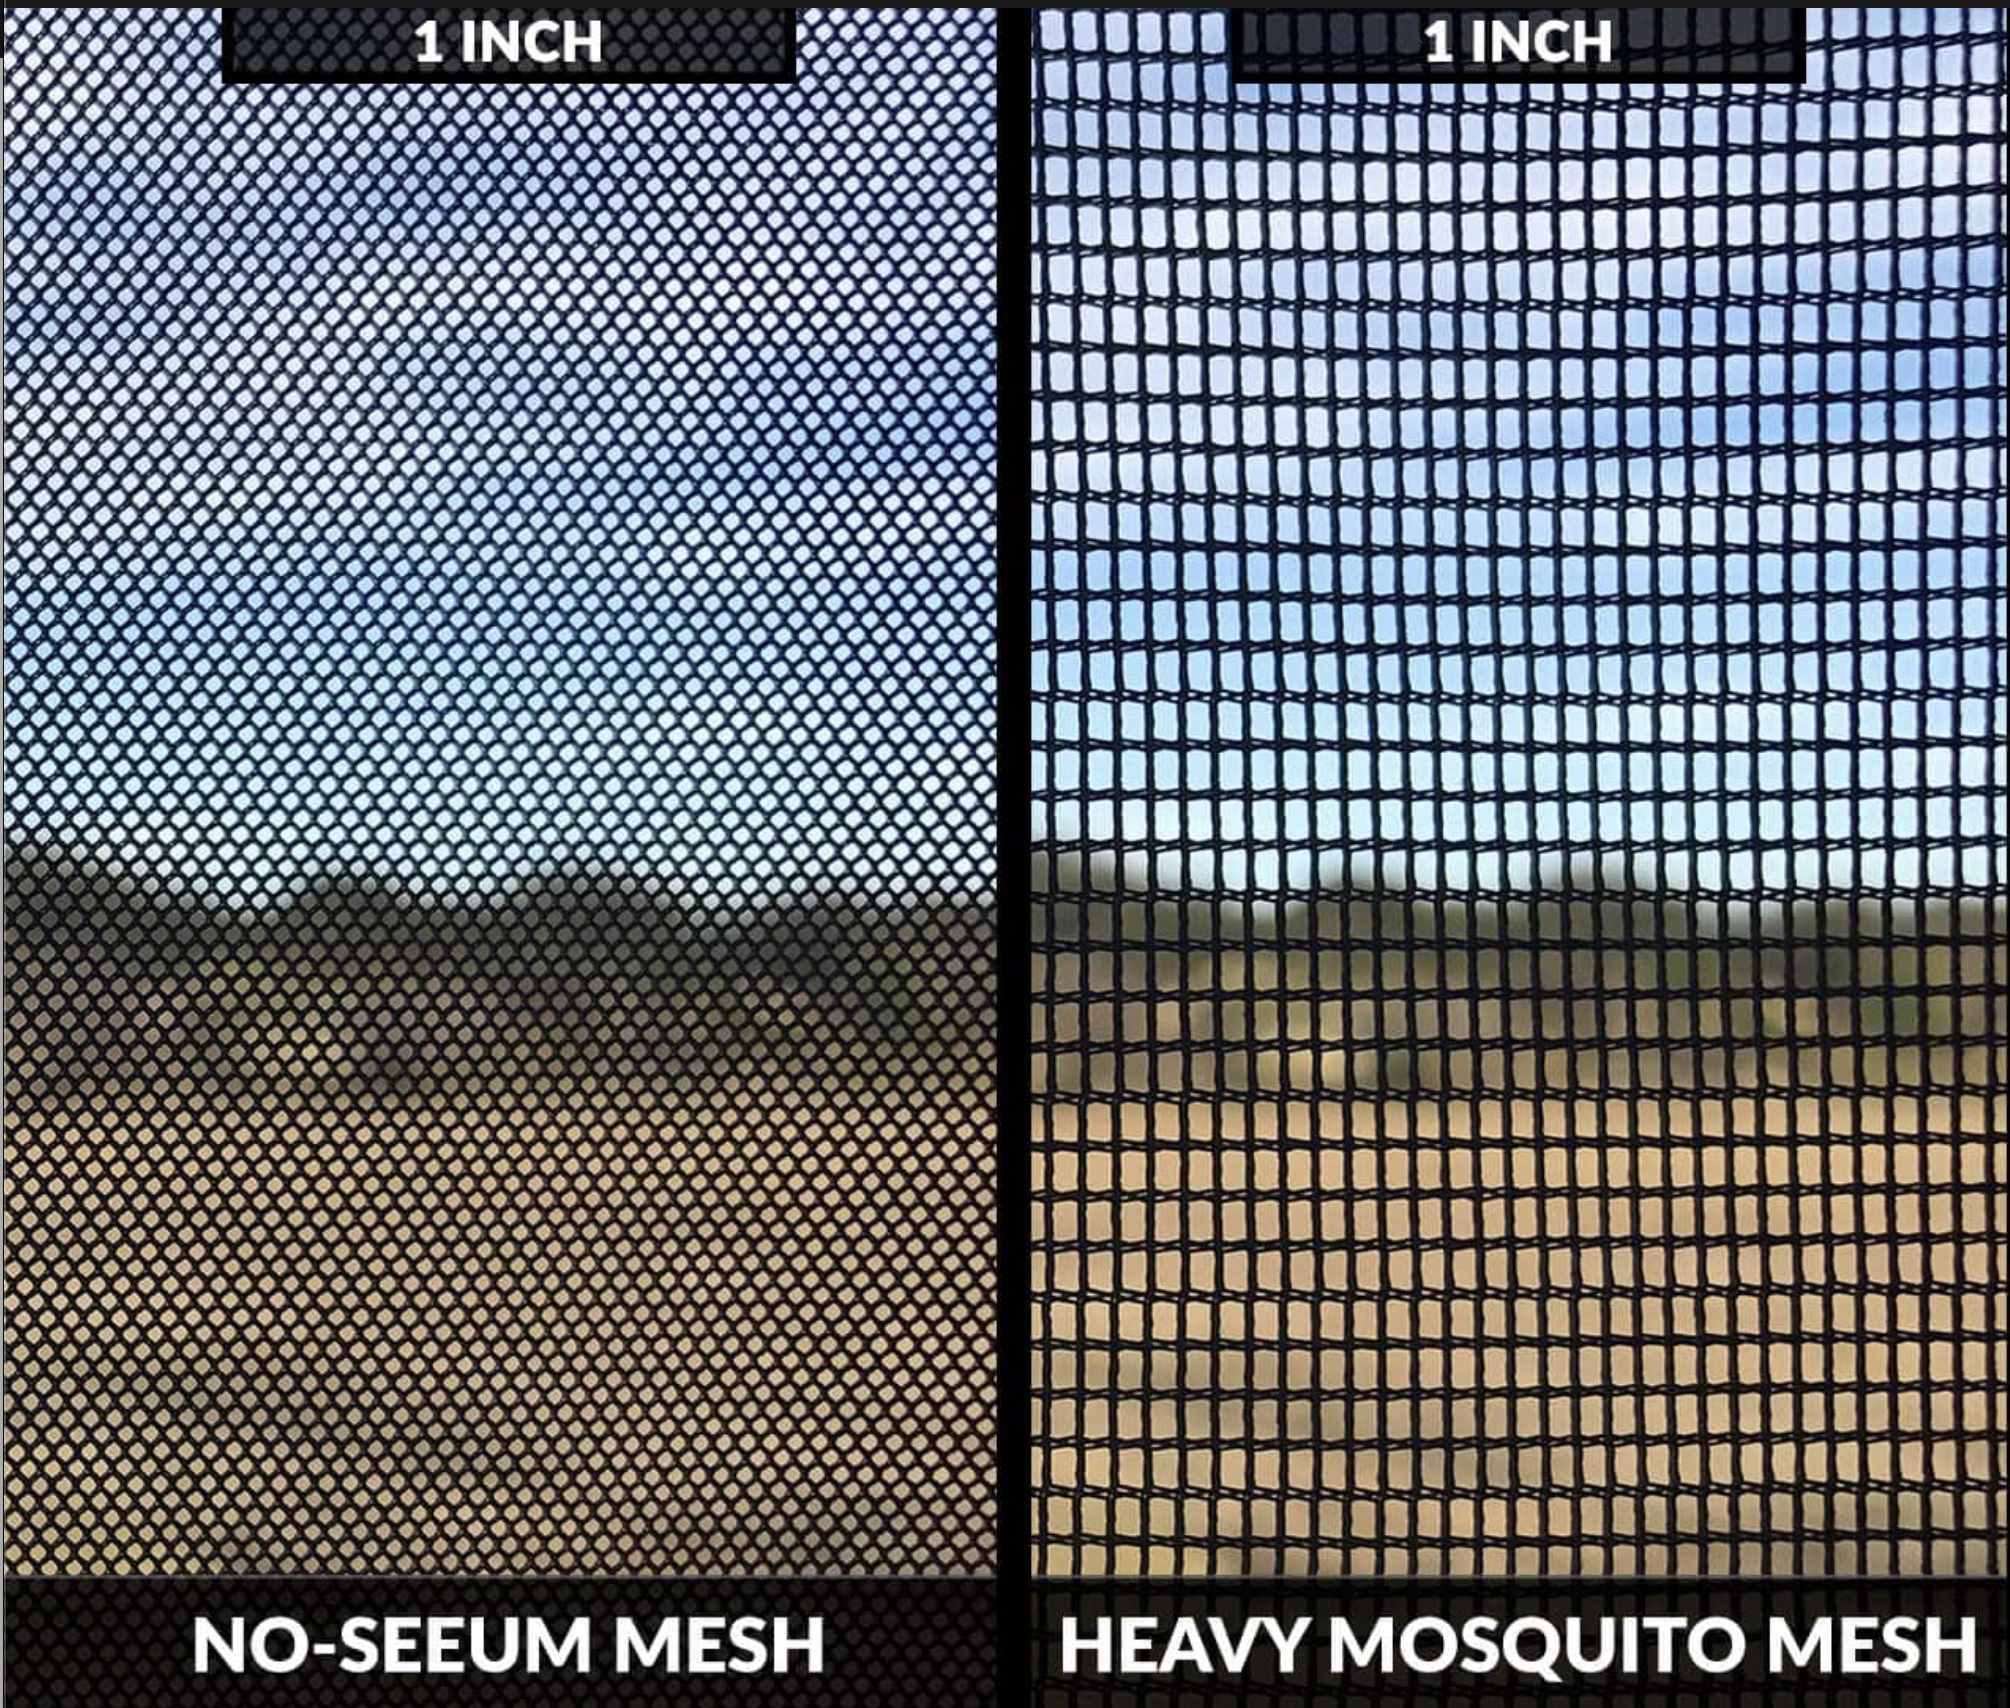
The screens successfully kept out mosquitoes and most other insects. Unfortunately, Costa Rica also has tiny biting midges—”no-see-ums”—that can pass right through ordinary insect screening. The solution is simple: Use a finer mesh. Although it will somewhat reduce the flow of air, it’s worth the tradeoff. This was one of the least consequential lessons we learned, but perhaps one of the easiest to fix.
Lesson #11: My compost toilets worked—but the design didn’t
The homemade two-chamber compost toilets were another interesting experiment that seemed excellent in theory. They saved water, eliminated the need for an expensive septic system, avoided many conventional plumbing problems, produced useful compost, were comfortable to use, versatile enough to sit or squat, and were extremely easy to clean. The composting itself actually worked remarkably well, far better than expected but, ironically, that turned out to be part of the problem.
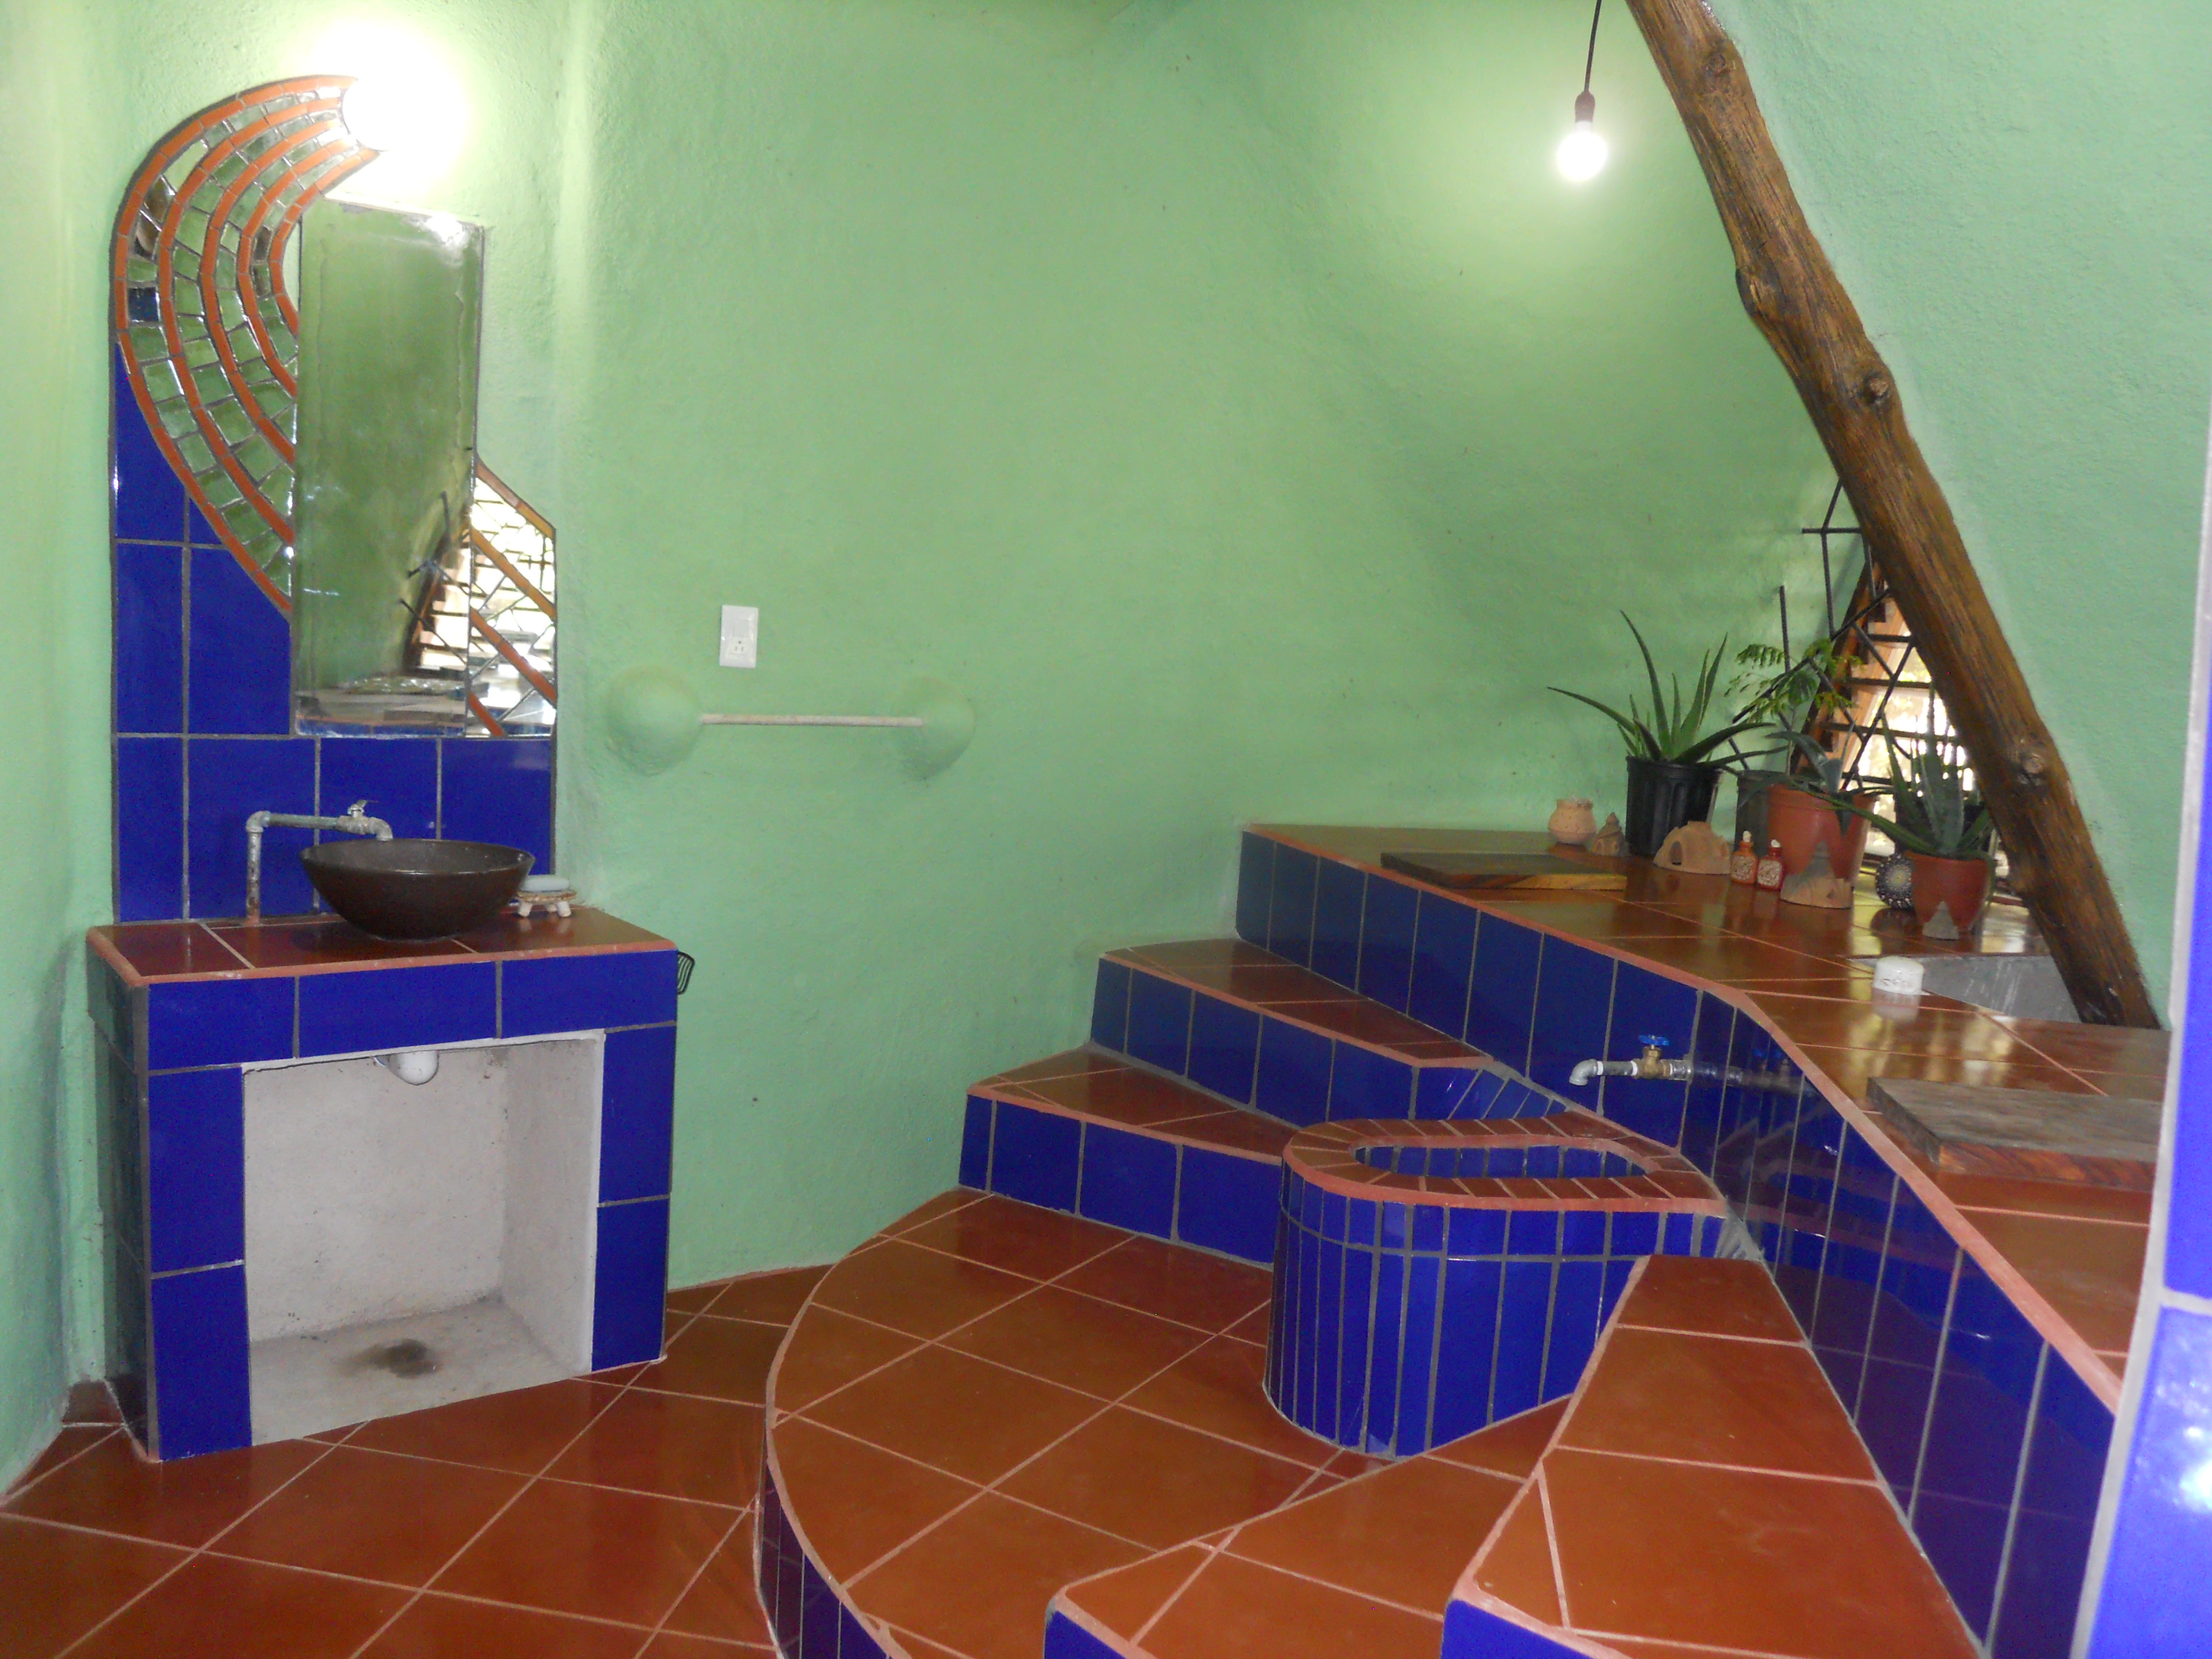
The compost toilets looked great and worked beautifully—at least until the “uninvited guests” started moving in…
Though there was no stagnant sewage smell like many septic systems in the tropics, the over-sized chamber (designed for minimal maintenance) created an excellent habitat for insects. Within weeks, flies and other insects apparently found ways into the chamber and laid eggs in the accumulating material. Once larvae became established deep within the pile, treating the surface did little to solve the problem. We eventually experienced waves of flies and gnats, followed by ants and even cockroaches.
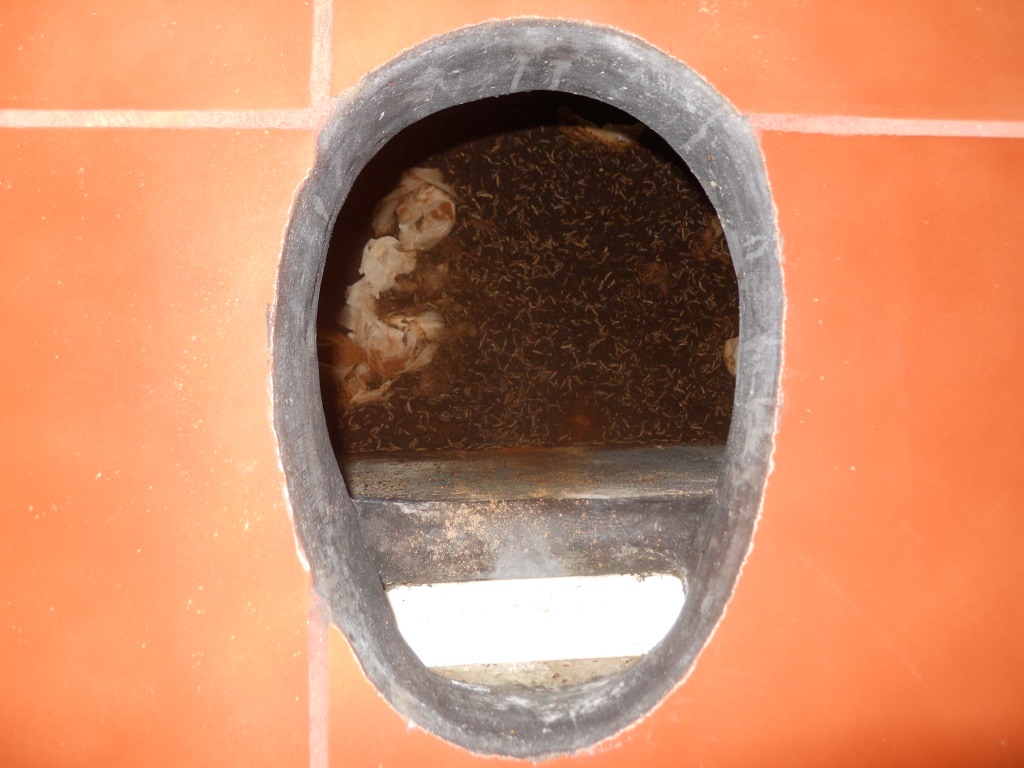
It’s a little gross (especially the next photo) but, for educational purposes, this is what it looked like standing in front and looking down in the toilet. (The white horizontal section is the urine diverter/separator in the front.) The composting itself worked remarkably well—but the oversized chamber also became an unintended breeding ground for insect larvae.
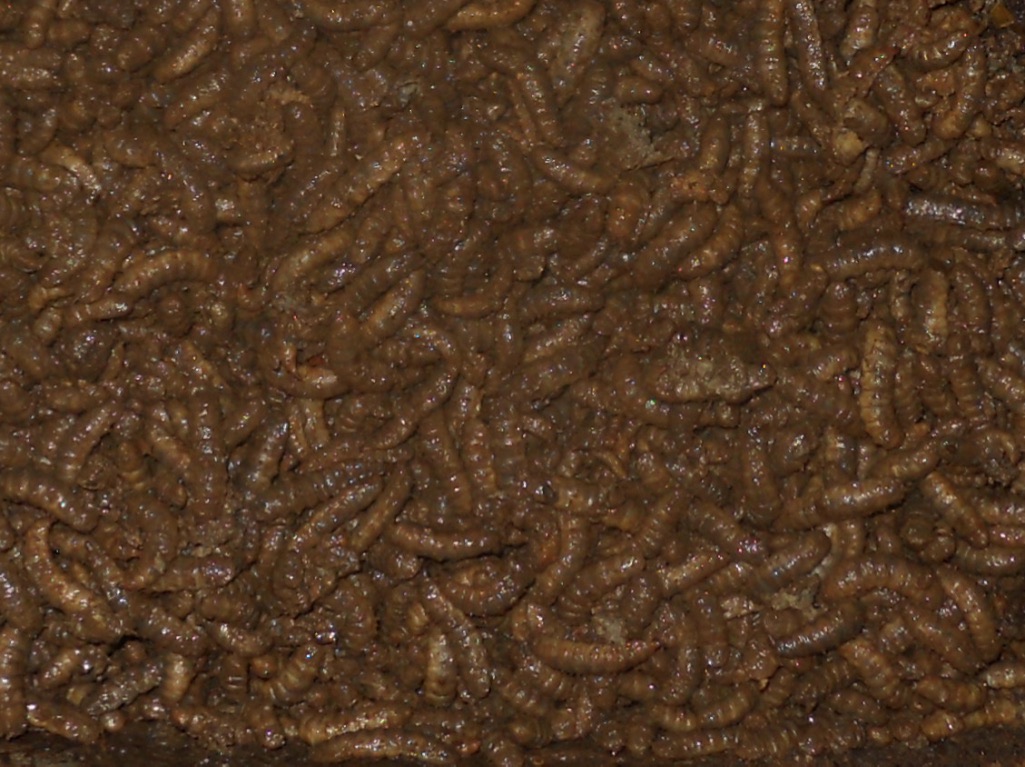
If you’re squeamish, don’t look at this photo but this was the moment I realized I hadn’t designed a compost toilet so much as I had designed a very effective insect nursery. Chicken feed, anyone?
Though larvae and worms are a normal part of the composting process, they aren’t actually required for decomposition. I had deliberately designed the system with the expectation that bacteria and fungi would gradually break down the fecal material over time. What I hadn’t anticipated was how difficult it would be to keep insects from getting into the chamber and establishing themselves there. I thought that keeping the toilet sealed when it wasn’t being used would be enough to keep out the flies and other insects that could lay eggs in the compost.
Because of its caustic nature, lime proved to be the most useful and economical treatment I found for the larvae, but it didn’t solve the fundamental design problem. The problem wasn’t that the material failed to compost. In fact, the larvae did an incredible job of accelerating the decomposition process, quickly consuming the fecal material as well as the discarded toilet paper. The problem was that I had unintentionally created an indoor ecosystem that was much more difficult to control than I had anticipated. If I were designing the system again, I’d favor a smaller, more easily sealed and replaceable chamber rather than attempting to compost such a large volume of material permanently within an indoor toilet. The composting system itself worked; what didn’t work was my ability to control the ecosystem it created. Sometimes the elegant theoretical solution isn’t the best practical solution. We ended up tearing out these composting toilets and replacing them with a conventional toilet and septic system.
Lesson #12: Wood and termites don’t mix
The eventual roof solved the biggest existing problem with the house, but it introduced another. We constructed the roof using long teak poles supported by separate posts on individual foundations around the perimeter. The roof worked. However, it also became a continuing battleground against termites and other wood-destroying insects. Though teak is naturally termite-resistant, it is NOT termite-proof and, in a tropical climate, that distinction is very important.
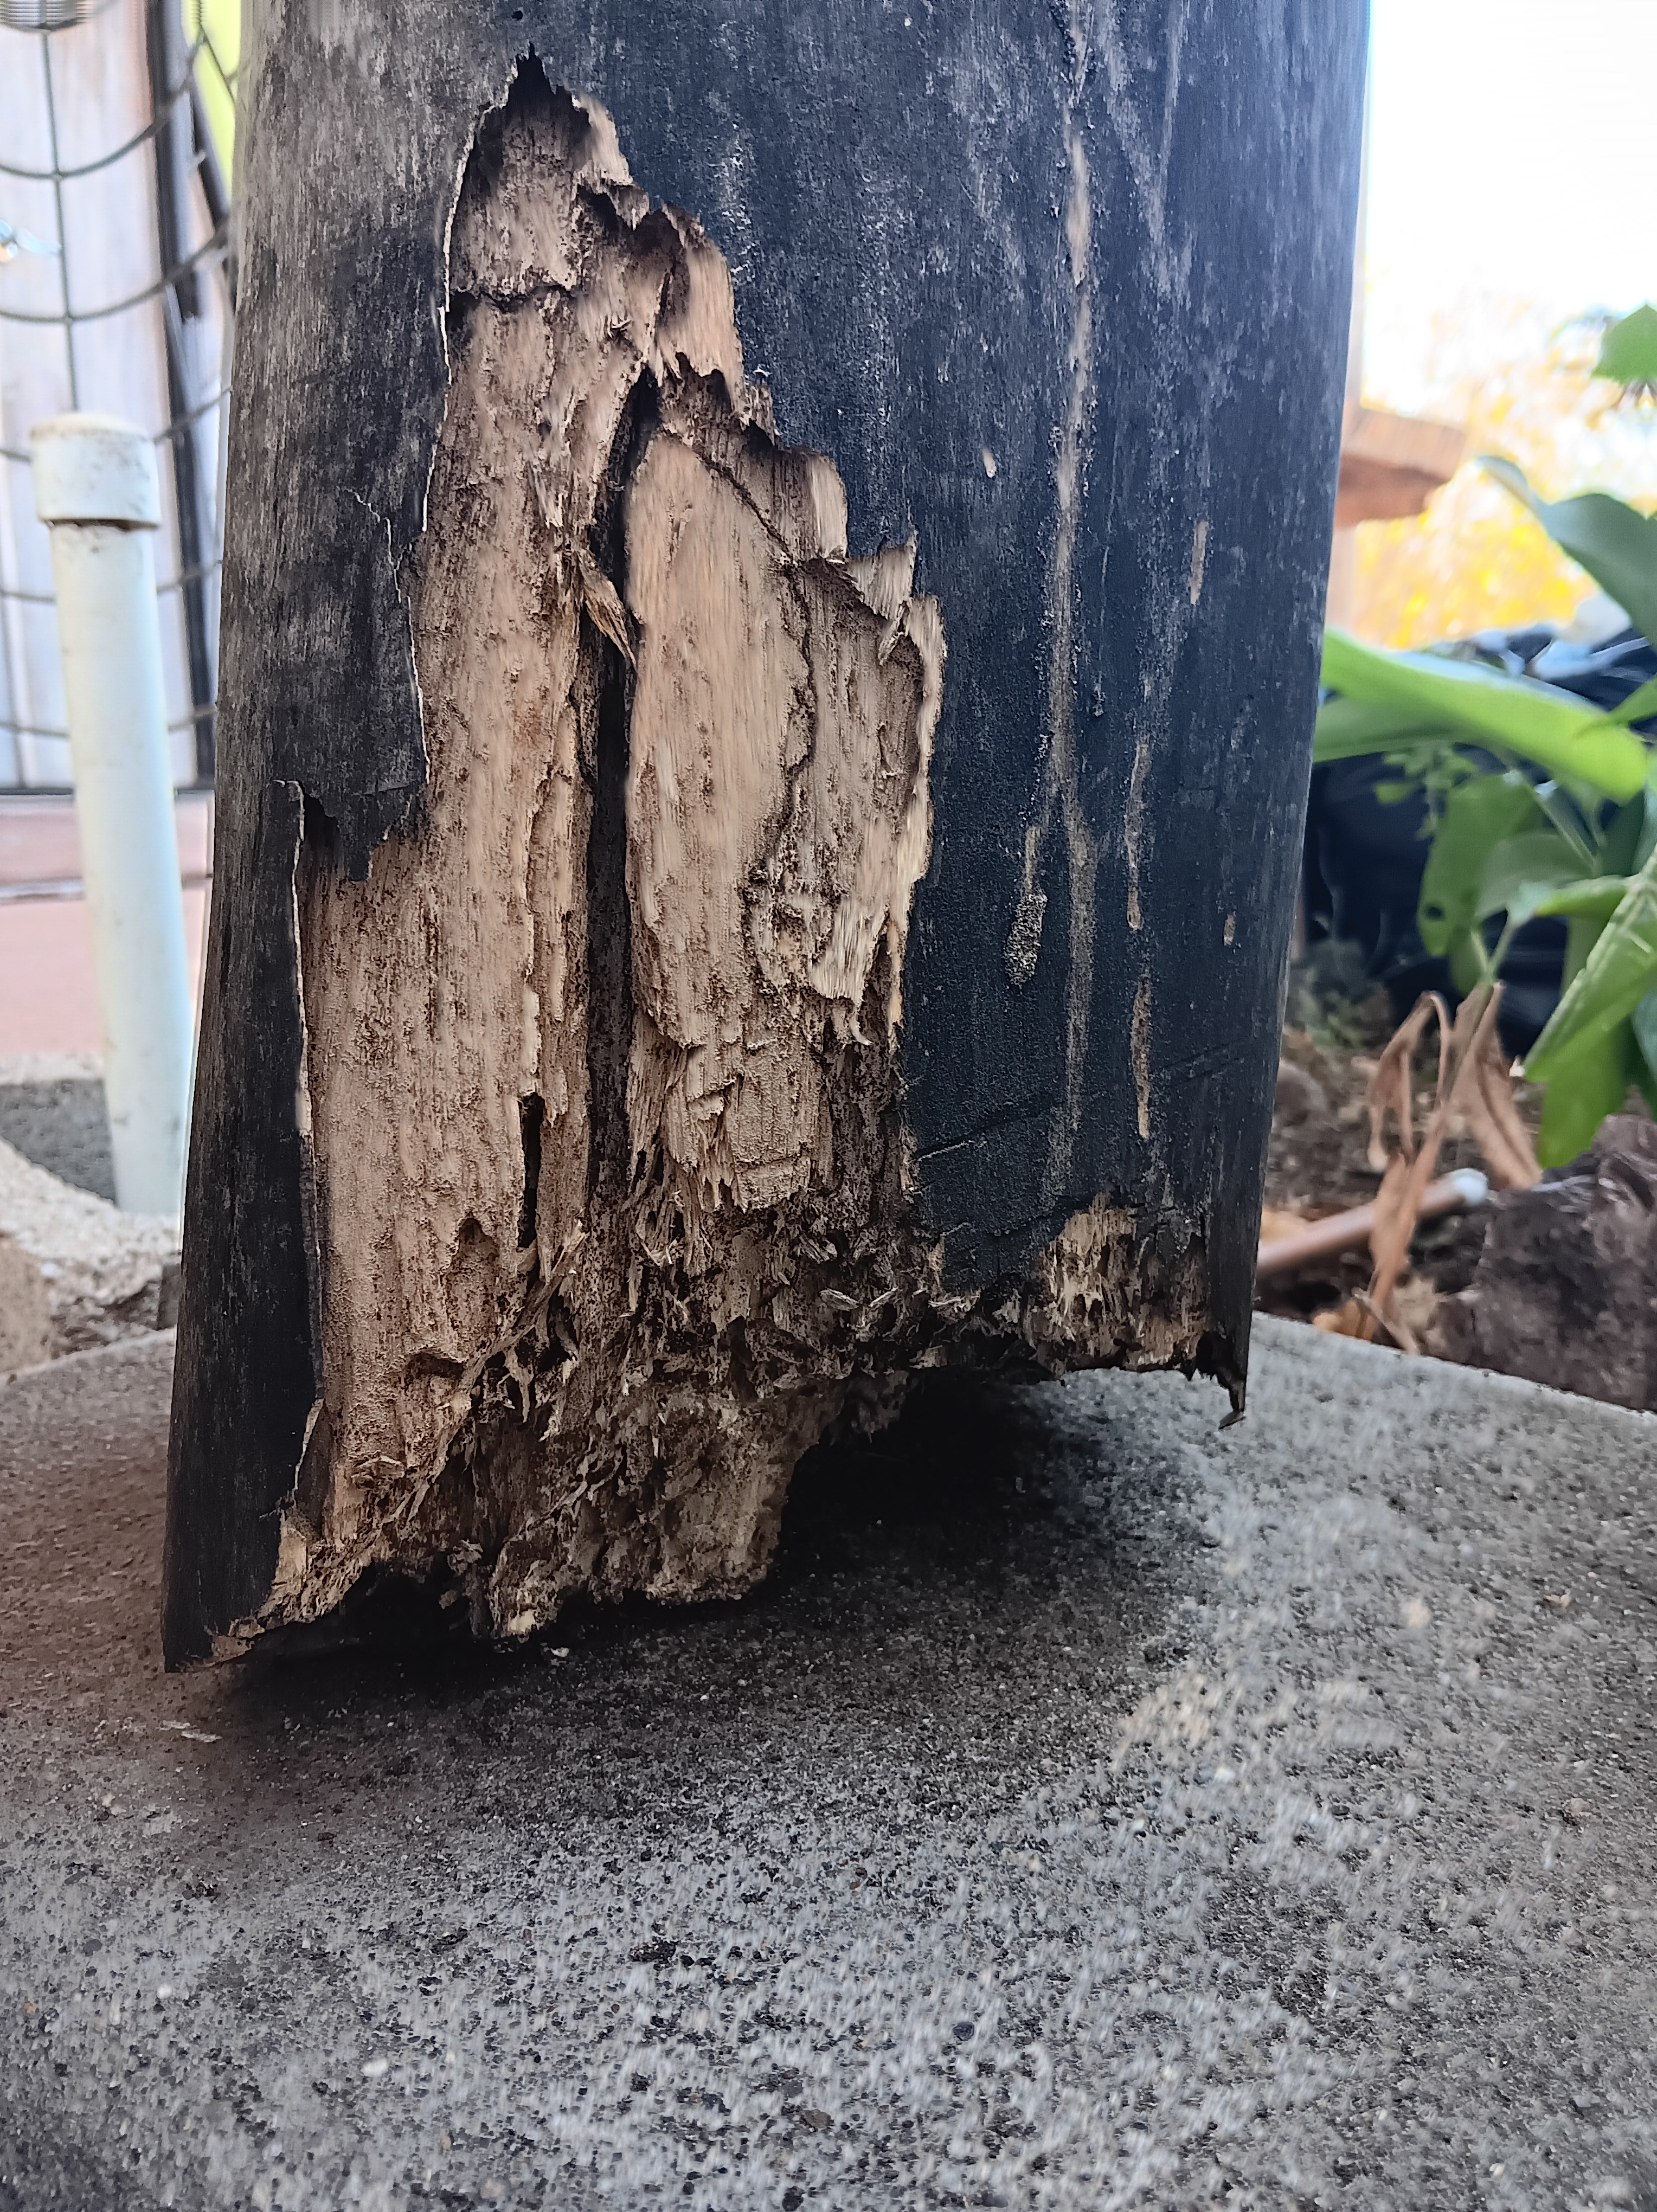
Check out at the extreme damage the termites did to the base of this wooden post. (It used to sit flat on the concrete footing.)
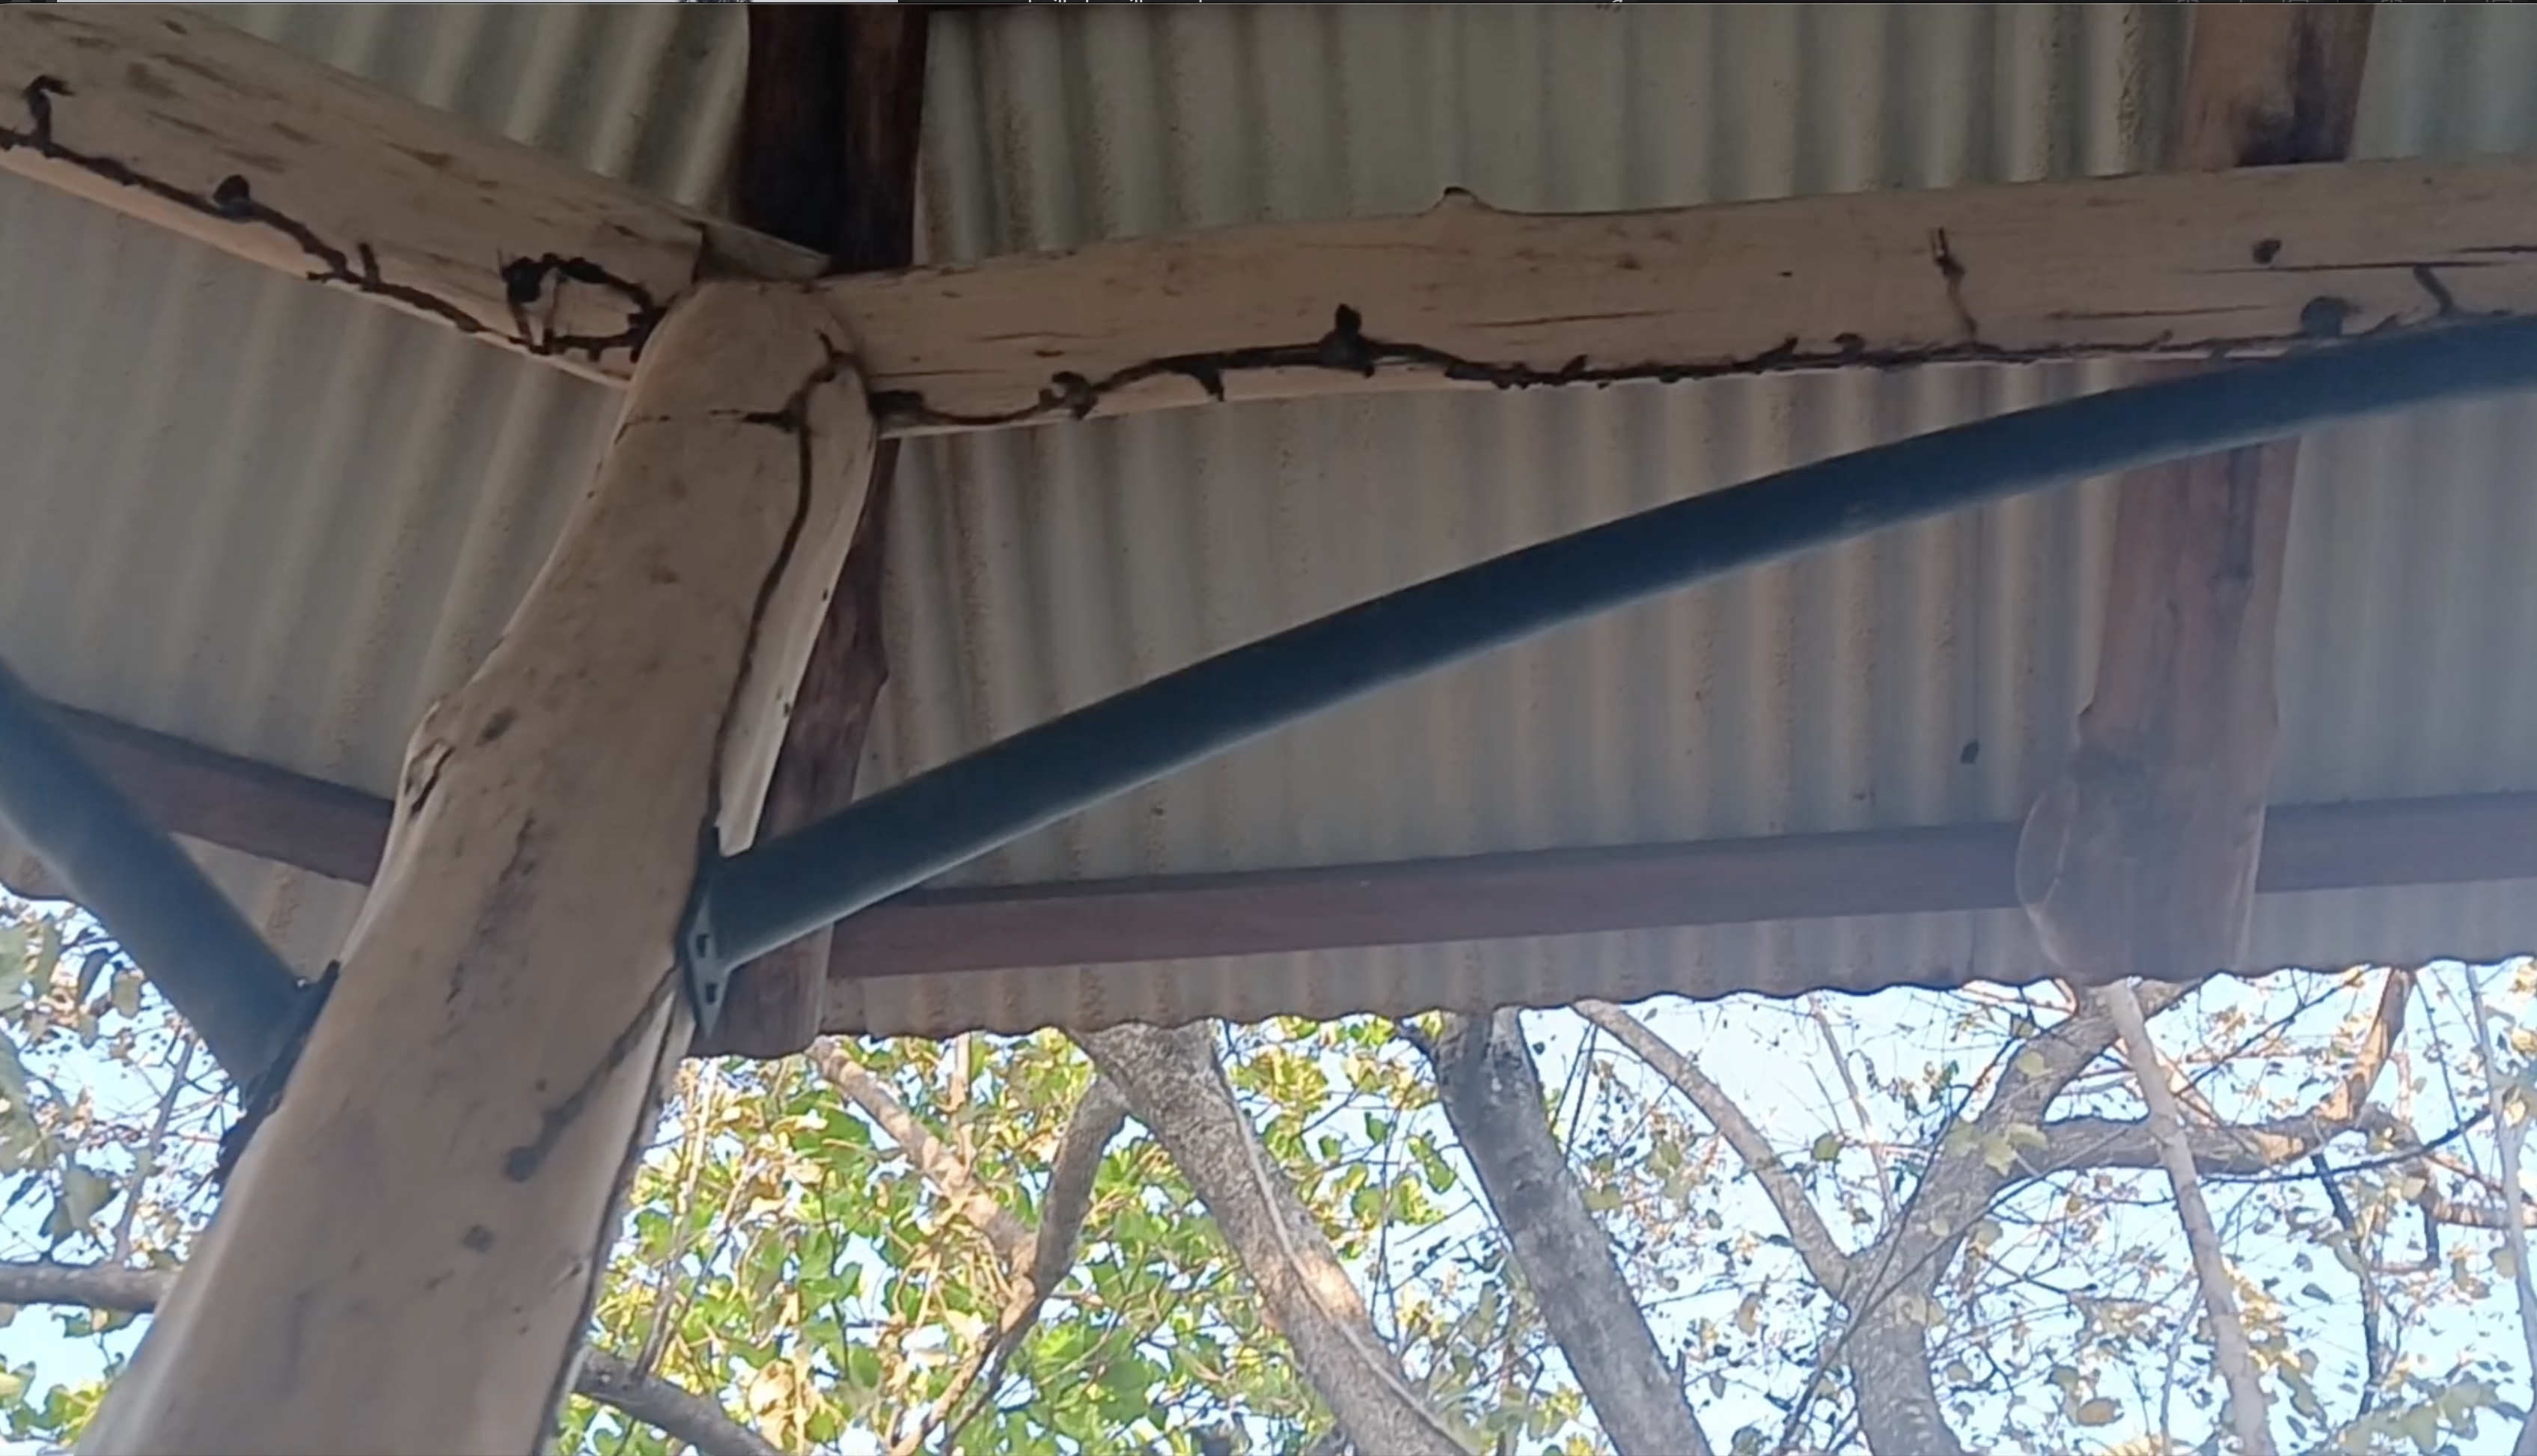
Termite tunnels on the roof.
Less than a decade after construction, the once vibrant marine blue enamel finish on the corrugated metal has faded and portions have begun to rust, especially on the edges where it was cut. A fresh coat of paint would easily solve that issue but the termite infestation has been the more persistent and troublesome maintenance problem. If I were building it again, I’d minimize wood (especially exposed wood), wherever possible. In tropical termite country, building with untreated exterior wood is essentially building with termite food, and even toxic pesticides tend to fail to keep them away for long.
The most important lesson I learned
My biggest mistake was assuming that, with the right combination of materials—whether natural, artificial, or modern synthetics—I could eliminate one of the oldest and most fundamental principles of traditional earthen construction in a wet climate. I spent so many years looking for a coating impervious to rain that could substitute for a roof, but in the end I came to the conclusion that, for the kind of straw-rich, raw-earth construction I was attempting in a tropical climate, an overhanging roof is indeed the most practical approach. Turns out, I merely reinvented the wheel. Not to say there’s no room for improvement, but sometimes the best technologies are the time-tested ones that humans figured out thousands of years ago. I guess I had to be reminded of that.
After reading this critique, I hope nobody comes to the conclusion that experimental construction is a bad idea. Quite the contrary! Experimentation is how we learn and willingness to pursue untested ideas can lead to new innovations. From the standpoint of saving time, labor, and money, I would have been better off building something a bit more conservative but I was itching to experiment with all the creative ideas I had floating around in my head and am very glad to have had the chance to experiment and learn many invaluable lessons from my mistakes. I hope that, by reading this article, you will have too.
This house I built in Costa Rica gave me something that books, videos, plans, and theoretical calculations could never have given me: years of firsthand experience living with the consequences of my design decisions. Some decisions turned out brilliantly and some didn’t. Some problems were caused by materials, some by construction errors, some by the climate, and some were simply the result of my trying to be too clever. I’m grateful for all of them because the next structure I build will benefit from everything this one taught me. And yes—if it’s in the tropics, it most definitely will have a roof—unless I can figure out another good way of keeping the rain off the walls. Live and learn…


One thought on “What I learned from building an unconventional roofless earthen house in the tropics”